显示标签为“Cheese Cake (乳酪蛋糕)”的博文。显示所有博文

2020年6月3日星期三

9寸巴斯克焦面乳酪蛋糕 (9" Basque Burnt Cheesecake )


已经整1年多,没烤过这个网红乳酪蛋糕了。

近来有点想念, 加上有网友问起9寸食谱。
所以就乘机考个9寸回味一下。


这蛋糕就是满满的乳酪和鲜奶油香气。
喜欢乳酪,鲜奶油的宝宝们,
一定无法说不。


加上做法简单。
甚至连鲜奶油都不必打发,就直接拌入面糊了事。
然后,还让你烤焦,爆脸,都不算犯规。


加上,成品香醇,美味可口;
难怪,引来一众粉丝,炸爆整个网络。
几乎每天都有人在搜寻此谱。

就以安迪之前分享8寸巴斯克焦面乳酪蛋糕来说,
已经有3x,xxx次数的点击率了。

加上其他人的分享,可想它的魅力有多厉害啊!


相比上回8寸的。
这回安迪刻意烤焦一些来比较以下。

还是那句,口味是很个人的。
我依然对金黄色情有独钟,
黑露露的,焦透透的,
还是留给有缘人好了。

除了不懂欣赏黑露露的外表,
也不喜欢带苦的味道。
(网上有人说,虽然烤焦了,一点都不苦,那是骗人的😥
今天,我证实了😜)


9寸巴斯克焦面乳酪蛋糕
9寸圆形烤盘
食谱参考  :这里

材料 :
625克     奶油乳酪,温室软化      
165克     细砂糖          
     4个    鸡蛋(B型)    
250克     动物性鲜奶油  
   17克    低筋粉              
     3克    粟米粉                

做法 : 
1.  预热烤箱190'C.  将烤盘铺上不沾盘油纸。
2.  将温室软化奶油乳酪与细砂糖,搅打至蓬松顺滑。
3.  加入一个鸡蛋拌匀后,再继续逐粒加入,拌匀。
4.  加入动物性鲜奶油,拌匀。
5.  加入筛过的低筋面粉和粟米粉,混拌成顺滑的面糊,倒入铺好油纸的烤模。
6.  送入预热烤箱 190度烤40分钟,转160度烤20分钟,最后调到上层,220度烤5分钟,以便表层呈现焦褐色即可。
7.  蛋糕出炉后,置放凉架上,待完全冷却,冷藏于冰箱4小时才享用。

温馨提点: 
~ 铺底的油纸,要用不沾性质的,以便容易脱模。
~ 烤箱温度和烘焙时间是随各家烤箱自做调整。
~ 表层的烧焦程度,也是随个人喜欢。 
~  可以用8寸圆形烤盘取代,成品会更高,好看。


混拌成顺滑的面糊,倒入铺好油纸的烤模。
gently fold into smooth batter,pour it into lined pan.


送入预热烤箱 190度烤40分钟,转160度烤20分钟,最后调到上层,220度烤5分钟,以便表层呈现焦褐色即可。 Bake with preheated oven at 190'C for 40 minutes,turn down to 160'C for 20 minutes, lastly switch the pan to upper lever, continue bake with 220'C for 5 minutes to have a burning look or dark brown in color for the surface,then done. 

9" Basque Burnt Cheesecake
9 "round pan
Recipe adapted from  :Here

Ingredints :
625g     Cream cheese,room temperature   
165g     Caster sugar    
     4      Egg(size B)    
250g     Whipping cream
  17g     Cake flour          
    3g     Corn flour     

Method : 
1.  Preheat oven at 190 'C.  Line the pan with non stick grease papper.
2.  Beat the room temperature cream cheese and caster sugar until smooth and fluffy.
3.  Add in 1 egg and beat to well mixed. continue to add in the balance egg one by one and beat to well mixed.
4.  Add in whipping cream, mix well.
5.  Add in sieved cake flour and corn flour, gently fold into smooth batter,pour it into lined pan.
6.  Bake with preheated oven at 190'C for 40 minutes,turn down to 160'C for 20 minutes, lastly switch the pan to upper lever, continue bake with 220'C for 5 minutes to have a burning look or dark brown in color for the surface,then done.
7.  Remove the cake from the oven, let it cool completely at the rack. Chill the cooled cake in the fridge for 4 hours to enjoy the better taste.


Tips :
~ Use the non-stick grease paper to easy the job of removing the cake from the pan.
~ The oven temperature and baking time can be vary oven to oven.
~ The burning surface of the cake can suit to  individual disired.
~  Can replace with 8 " round pan, the cake may turn out higher and nicer.


@@@@@@@ Enjoy! @@@@@@


2020年5月3日星期日

免烤火龙果乳酪蛋糕(Non-bake Dragon fruit Cheesecake )


安哥网购一批火龙果。
吃着吃着,安迪突然想做个火龙果乳酪蛋糕。


上网觅食谱,东参西阅,终于有了头绪。
可是有点担心,毕竟没吃过,不懂味道如何?

因此,还是保守一些,做个混合原味的。
希望如果有个三长两短,
还是有个原味可以功过相补。


刚刚下午茶,终于切片断结果。
结果。。。。。
yeah...........✌
整体来说是既漂亮又好吃✨✨
开心,开心!


家里的消化饼所剩有限,
所以加了少许苏打饼,核桃,巧克力粉。。。。。
反正MCO期间,材料有限,
只能就地取材了。
重点是,依然美味可口,😋


瞧,饼底带有核桃香,口感香脆。

蛋糕体顺滑,绵软,甜中带微酸,乳酪香醇迷人,

加上淡淡的火龙果香气,
这是一款好好吃的乳酪蛋糕。


免烤火龙果乳酪蛋糕
- 做1个 8 寸圆形乳酪蛋糕

底层
250 g 消化饼
50 g 烤香核桃
150 g 溶化奶油

做法:
1。 在一个8寸圆形脱底烤模涂上一层油。
2。 以搅拌机将消化饼和烤香核桃搅拌成细幼的饼碎。将饼碎倒入烤模,倒入溶化奶油,搅拌均匀,以压板压紧成乳酪蛋糕底。冷藏于冰箱30分钟。

原味内馅
250 g 室温奶油乳酪
80 g 细砂糖
1 Tbsp 柠檬汁
8 g 明胶粉
100 ml 动物性鲜奶油

做法
1。 隔热水,将奶油乳酪和细砂糖搅拌成顺滑的奶油糊,置旁待用。
2。 隔热水,将 明胶粉加上1汤匙水,溶化。
3。 将动物性鲜奶油打发。然后将打发鲜奶油拌入做法(1)的奶油糊,拌匀。 加入溶化明胶粉,拌匀。
4。 冰箱取出蛋糕饼底,表层插洞洞。 将做法(3)的乳酪混合物倒在蛋糕饼底上。冷藏与冰箱30分钟或表层凝固。


火龙果味内馅
250 g 室温奶油乳酪
20 g 细砂糖
120g  火龙果丁
100g   炼奶
1 Tbsp 柠檬汁
10 g 明胶粉
100 ml 动物性鲜奶油

做法
1。 隔热水,将奶油乳酪和细砂糖搅拌成顺滑的奶油糊。以搅拌机将火龙果丁和炼奶搅拌成火龙果汁,倒入奶油乳酪糊,拌匀成火龙果奶油乳酪糊,置旁待用。
2。 隔热水,将 明胶粉加上2汤匙水,溶化。
3。 将动物性鲜奶油打发。然后将打发鲜奶油拌入做法(1)的火龙果奶油乳酪糊,拌匀。 加入溶化明胶粉,拌匀。
4。 冰箱取出蛋糕,表层插洞洞。 将做法(3)的火龙果乳酪混合物倒在蛋糕上。冷藏与冰箱至少4个小时即可享用。


以搅拌机将火龙果丁和炼奶搅拌成火龙果汁
 Blend the dragon fruit and condense milk into juice


Non-bake Dragon fruit Cheesecake 
- Makes one 8 inch cheesecake

Base
250 g digestive biscuits
50 g walnuts
150 g melted butter

Method :
1. Grease an 8 inch spring form cake tin.
2. In the food processor, pulse the biscuits and walnuts until they turn into fine crumbs. Add in melted butter and pulse until combined. Press into the bottom of the tin, and refrigerate for about 30 minutes while you are making the filling.

Cheese filling
250 g cream cheese, at room temperature
80 g sugar
1 Tbsp lemon juice
8 g  gelatin powder
100 ml whipping cream

Method :
1.   Use double-boil method, stir-blend the cream cheese  and sugar until become a smooth cream cheese batter. Set aside .
2.   Use double-boil method, melt the gelatin powder with 1 Tbsp water.
3.  Whip the whipping cream in a stainless steel bowl surrounded by ice cubes, until soft peaks form. Pour it into step(1) cream cheese batter, mix well. Add in melted gelatin powder, mix well.
4.   Take out the cake base from the fridge, poke the surface for wholes.  Pour the cheese mixture (from step 3) on to the cake base, chill it in the fridge for 30 minutes or until the surface solidified.


Dragron fruit cheese filling 
250 g   
cream cheese, at room temperature
20 g     caster sugar 

120g    diced dragon fruit
100g    condense milk
1 Tbsp  lemon juice
10 g      gelatin powder
100 ml   whipping cream

1.   Use double-boil method, stir-blend the cream cheese  and sugar until become a smooth cream batter.  Set aside . Blend the dragon fruit and condense milk into juice. Pour it into the cream cheese to become dragon fruit cream cheese . Set aside.
2.   Use double-boil method, melt the gelatin powder with 1 Tbsp water.
3.  Whip the whipping cream in a stainless steel bowl surrounded by ice cubes, until soft peaks form. Pour it into step(1) dragon fruit cream cheese batter, mix well. Add in melted gelatin powder, mix well.
4.   Take out the cake base from the fridge, poke the surface for wholes.  Pour the dragon fruit cheese mixture(from step 3) on to the cheese cake , chill in the fridge for at lease 4 hours  or until the surface solidified.


下午茶时间,来片美味的火龙果乳酪蛋糕,

加上一杯解暑的苹果花茶,

顿时,
活力充电💪💪


想到明天可以外出运动,小开心哦!


苹果花茶,薰衣草茶,红玫瑰花茶,
是一位朋友的心意,
谢谢你😘


@@@@@ Enjoy ! @@@@@@

2020年4月6日星期一

免烤柠檬乳酪蛋糕(杏桃嗻哩上层)Non-bake Lemon Cheesecake (with apricot jelly topping )


4月6日,
安哥的生日。

2019年3月29日星期五

巴斯克焦香乳酪蛋糕(Basque Burnt Cheesecake)


Burnt Cheesecake 就是“烧焦的芝士蛋糕”。
最早起源于西班牙的巴斯克地区,
后来不仅在日本大红,还被纽约时报奉为 2019 年度甜品。

2019年3月13日星期三

岩烤芝士蜂蜜蛋糕之奶油乳酪版 (Honey Baked Cheesecake using cream cheese)


“岩烤芝士蜂蜜蛋糕”,
曾经一度风靡脸书的蛋糕。

约2年前左右吧,
差不多每天都看到“岩烤芝士蜂蜜蛋糕”的出现。

当时安迪也有好奇它的魅力所在?


2017年7月5日星期三

古早味帕美申芝士蛋糕 (Taiwanese Parmesan Cheesy Sponge Cake)


再来古早味芝士蛋糕。。。。
因为家人的要求;

因为上回(古早味车达芝士蛋糕)时,跳过汤面步骤;
因为上回用错A蛋,导致泻模;
因为上回家里没有帕美申乳酪碎;

所以今天再度开炉圆梦!

2017年5月16日星期二

Taiwanese Cheddar Cheesy Sponge Cake (古早味车达芝士蛋糕)


I believe most of you know about this highly popular cheesy cake.
It has been flooding my Facebook feed every day in a short time.
Most of my baking friends have tried baking it.
Some said it is full of cheesy aroma and fantastically yummy!
On the other hand, some said it is nothing special, and is just like another ogura cake or sponge cake,
besides the addition of a lot of cheese.


2017年5月7日星期日

Non-bake Lemon and Lime Cheesecake (免烤柠檬酸柑乳酪蛋糕)


Cheesecake is often well received in my family.
Today I made another cheesecake specially for my second brother-in-law (二伯)
who put a lot of effort into helping me repair my netbook.
Even though in the end, I couldn't get back my old one but had to buy a new one instead,
the hard work he had done is still much appreciated .
Therefore, I made this yummylicious lemon and lime cheesecake for him as token of appreciation.

2016年7月22日星期五

柠檬乳酪杯子蛋糕 (Lemon Cheese Cupcakes)


 近来,安迪又犯散漫,
这个杯子蛋糕是迟交的功课,
希望好姐妹大人有大量,不要见怪。
呵。。。呵。。。。


2015年11月13日星期五

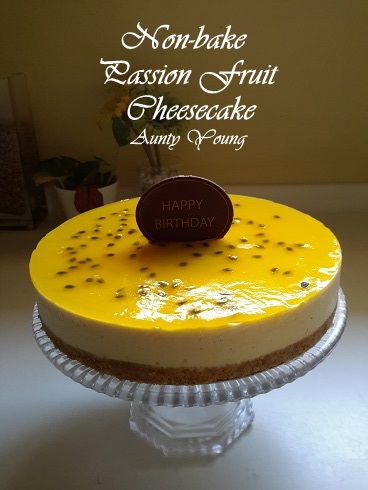
免烤百香果乳酪蛋糕 (Non-bake Passion Fruit Cheesecake)


前几天(9/11)是契女,Mel的生日。
因为今年巧遇SPM考试,为了不耽误她做最后冲刺,
契妈我只能暂时送上亲自做的生日蛋糕,
一来祝她生日快乐!而来愿她考试顺利!

我们已经约好,下个月的9号,
也就是生日的一个月后,好好的补庆一番。


免烤百香果乳酪蛋糕
(7寸圆形脱底模/6寸方形脱底模)

饼干底 :
苏打饼干片 – 80g
烤香核桃 - 20g
牛油 – 50g

乳酪蛋糕体 :
软化奶油乳酪 – 270g
细砂糖 – 55g
百香果 – 3颗(只取果汁)
动物性鲜奶油– 100g
吉利丁片 –10g

上层材料 :
百香果 -1颗
芒果汁或水(芒果汁或水加上百香果共90毫升)
吉利丁片- 2g


饼底做法 :
1。 将苏打饼干和烤核桃放入塑胶袋,以擀面棍压碎
2。 牛油隔水溶化,然后加入以上的饼干碎,拌均匀
3。 倒入已包上铝箔纸的底部,用汤匙压平,冷藏于冰箱约30分钟。

乳酪蛋糕体做法 :
1。 吉利丁片泡冰水软化,备用
2。 将奶油乳酪和细砂糖隔热水拌至无颗粒状,加入百香果汁拌均匀。
3。 将动物性鲜奶油倒入一个外围冰块的钢盆中,打发。
4。 把打发的动物性鲜奶油加入乳酪糊里,拌均匀。
5。 将泡软吉利丁片挤干水分放入以上乳酪糊,搅拌至溶解。
6。 最后将乳酪糊倒入饼底上,盖上保鲜膜,冷藏于冰箱冷藏3个小时或表面凝固。


上层做法:
1。 芒果汁加百香果肉共90毫升与2克的泡软吉利丁片,个热水煮至吉利丁片溶解。
2。 取出乳酪蛋糕,淋上百香果果冻,普盖上保鲜纸,再度冷藏于冰箱约6小时或隔夜。


 Non-bake Passion Fruit Cheese cake
(7 inch round tin with removable base/ 6 inch square tin with removable base)

Biscuit base:
80g digestive biscuits
20g toasted walnut
50g butter

Cream cheese mixture :
270g softened cream cheese
55g castor sugar
3 passion fruit (only extract the juice)
100g whipping cream
9g gelatin leaf

Topping ingredients :
1 passion fruit
mango juice or water ( plus passion fruit to get a total 100ml)
2 g gelatine leave (soak into cool water to soften it)


Method for biscuit base:
1. Pour in the digestive biscuits and toasted walnut in a plastic bag and crush them with a rolling pin.

2. Double-boil the butter to melt it , then mix it evenly with the biscuit crumbs from (1).

3. Pour the crumbs mixture into the aluminum foil-lined round tin, flatten them evenly into a base, then chill in the fridge for about 30 minutes.


Method for cheesecake:
1. Immerse the gelatin leaf into ice water and set aside for later use.

2. Double boil the cream cheese + caster sugar and stir until the sugar has completely dissolved. Pour in the passion fruit juice, stir well.

3. Whip the whipping cream in a stainless steel bowl surrounded by ice cubes, until soft peaks form.

4.  Pour in the whipped whipping cream into the cream cheese mixture(step 2), mix well.

5. Drain the gelatin leaf of excess water and mix it into the cheese mixture(step 4). Mix evenly.

6. Pour the cheese mixture into the tin and chill in the fridge for 3 hours or until the surface solidifies.


Method for topping:
1.  Measure a total of 90 ml mango juice /water + passion fruit. Mix them with 2g of softened gelatin leaves in a double boil pot, until the gelatin leave have fully melted.

2.  Remove the cheese cake from the fridge, pour the passion fruit jelly on it, cover with wrapping paper and chill for about 6 hours or overnight.


这次同样的食谱,我做了2个蛋糕。
一个是7寸圆形,送给契女;
另外一个是6寸方形,给那两父女。
因为他们可是乳酪蛋糕控,
怎么可以没份吃呢?


@@@@@ Enjoy ! @@@@@

2015年9月8日星期二

百香果乳酪杯子蛋糕 Passion Fruit Cheese Cupcakes


相知恨晚!
说的就是我与百香果。
哈。。。。。不怕笑话了,安迪还真的第一次吃百香果,

几年前,朋友曾经给过这百香果,当时厨艺尚浅的我;
也没找“谷哥”问路的习惯。
当时手握此宝却当草,由得它搁在厨房角落,
直到外皮枯皱(其实是成熟香醇),以为坏了,毫不留情,把他给扔掉。
现在想起来,还真的不惜福啊!也辜负了朋友的一番心意,愧疚呢!!!
朋友,一万个对不起hor,都怪我笨拙不懂事, 让你错爱了。


事隔数年,再度重逢,时日的我,对百香果已略有所闻。
所以当May给了我7粒,我如获至宝,快快把它们藏于冰箱,
今天用力5粒,烘了这个非常美味可口的百香果乳酪蛋糕。
剩余的2粒较生涩,等它成熟,再好好的消掉。


或许。。。。人与事都得对的时间,
才能察出漂亮的火花!
就如我与这百香果,第一次相遇不相识;
幸好还有第二次,而且相识恨晚,一试钟情!
在此谢谢媒婆(May),哈。。。哈。。。。


蛋糕体湿润棉滑,
香醇的奶油芝士因为清新的百香果的加入,被中和得香而不腻。
 上层的乳酪霜更是酸酸,甜甜,醒胃呢!

吃了一口,再一口。。。。。。。。
此时此刻,我。。。。忘了什么是卡路里!
天呀!


百香果乳酪杯子蛋糕
食谱参考 : Min's Blog

材料:
奶油 185g
细糖 170g (我减到150g) 
香草精 1tsp
鸡蛋 3个
奶油乳酪 125g
百香果肉 2个
自发面粉 125g
面粉 30g
牛奶 60ml

上层乳酪霜
糖粉 250g (我减到100g)
奶油乳酪 100g
奶油 50g
百香果肉 3个

做法:
1。乳酪霜 :把奶油和奶油乳酪搅拌均匀, 慢慢筛入糖粉, 最后拌入百香果肉, 放入冰箱备用。

2。 用电动搅拌器, 把奶油和细糖打发, 拌入香草精。

3。 徐徐加入蛋液, 搅拌均匀。加入奶油乳酪和百香果肉, 拌匀。最后筛入粉类和牛奶, 拌匀。

4。 将面糊舀入纸杯, 放入预热180‘C的烤箱, 烤20分钟。

5。 蛋糕取出, 待凉后, 用挤花袋,把乳酪霜挤在上面, 放些百香果肉装饰, 即完成。


百香果 Passion fruits


Passion Fruit Cheese Cupcakes
Recipe adapted from : Min's Blog

Ingredients :
Butter 185g
Caster sugar 170g (I reduced to 150g)
Vanilla essence 1tsp
Egg 3个
Cream cheese 125g
Passion fruit flesh 2
Self raising flour125g
Flour 30g
Milk 60ml 

Topping Cream:
Icing sugar  250g (I reduced to 100g)
Cream cheese  100g
Butter 50g
Passion fruit flesh 3
  
method :
1. Topping Cream : Cream the butter and cream cheese until smooth, slowly add in sifted icing sugar, pour in passion fruit flesh and mix well. chill in the fridge for later use.

2. Use electrical mixer,cream the butter and caster sugar, add in vanilla essence.

3. Add in the eggs one at a time and beat evenly. Add in cream cheese and passion fruit flesh,mix well. Lastly  add in sifted flour and milk, mix well.

4. Scoop the batter into the paper cups and bake with preheated oven at 180'C for 20 minutes.

5. Once the cake is cooled, pipe with the topping cream on it and serve.
Add in the eggs one at a time and beat evenly

Copy the BEST Traders and Make Money (One Click) : http://ow.ly/KNICZ


百香果因为有波萝、香蕉、芒果、石榴、
柠檬、草莓、西瓜、酸梅、水蜜桃等10多种水果的浓郁香味,
故得名百香果。其实噢,
 百香果也有爱情果和情人果之称。


@@@@@ Enjoy ! @@@@@

Related Posts Plugin for WordPress, Blogger...