显示标签为“Swissroll (蛋糕卷)”的博文。显示所有博文

2019年4月3日星期三

巧克力飓风蛋糕卷(Chocolate Hurricane Swissroll)


飓风蛋糕初体验。。。


2016年7月5日星期二

LV 咖啡蛋糕卷 (LV Print Coffee Swiss Roll)


这两天看到许多好姐妹分享各种可爱又漂亮的蛋糕卷。
让本来没“木”的安迪,突然也兴致勃勃,
再度卷起蛋糕卷。

2015年6月24日星期三

草莓彩绘蛋糕卷(Strawberry Pattern Swissroll)


 最近懒虫缠身,加上烤炉在闹情绪,
所以就少了更新帖子。
今天因为娜娜的生日,安迪再懒也不忍让她失望,
看着冰箱那盒草莓,还是懒懒的换汤不换药,
豹纹变成可爱的草莓,希望娜娜会喜欢。


蛋糕体松软,充满浓郁的草莓香气。
香甜的奶油搭上微酸的草莓片,
个人还蛮喜欢这样甜酸的配搭。


草莓彩绘蛋糕卷
模具:11寸 x 8寸烤盘
材料:
蛋黄 。。55克
蛋白 。。130克
幼糖 。。30克(加入蛋白中)
幼糖 。。35克(加入蛋黄中)

草莓粉 。。1茶匙
粟米油 。。35克
牛奶 。。45克
低筋面粉 。。70克
 
一些食用绿色素,红色素

咖啡内陷:
适量打发植物性鲜奶油 +切片新鲜草莓

做法:
1。蛋黄加入幼糖拌匀至糖溶化,加入粟米油,牛奶拌匀成糊。筛入低筋粉拌匀。

2。准备2个小碗,分别加入1汤匙匙和2汤匙的做法(1)面糊。取适量的绿色素调入小分量的碗内;另外再取适量的红色素调入大分量的碗内。剩余的面糊调入1茶匙的草莓粉。


3。蛋白分次加入幼糖,打至湿性发泡的蛋白霜。

4。将 1/2汤匙的蛋白霜加入绿色色糊拌匀盛入挤花袋;将1汤匙蛋白霜加入红色面糊拌匀盛入挤花袋。

5。 开始跟着印图挤出草莓纹,然后放入预热烤箱,150'C 烤1分钟。


6。将剩余(草莓色)的面糊和剩余的蛋白霜拌匀,倒入烤好草莓纹的烤盘,抹平,震几下烤盘,放入预热烤箱,160'C,约15-20分钟,出炉后撕开油纸。

7。将 作法(6 )涂上一层薄薄的鲜奶油内馅(涂在没有草莓纹的一面),排上切片新鲜草莓,将它卷起后,用锡纸包好,放入冰箱冷藏半小时即可。
 
~~~烤箱温度不一,请根据自己烤箱的热度~~~


Strawberry Print Swissroll
Uses an 11 x  8 inch baking tray.

Ingredients:
55g egg yolk
130g egg white
30g caster sugar (added to the egg white)
35g caster sugar (added to the egg yolk)

1tsp strawberry powder
35g corn oil
45g milk
70g cake flour
Some edible green coloring and red coloring 
 

Cream filling:
Some whipped topping cream and some slices of fresh strawberry


Method:

1. Add the caster sugar to the egg yolk and beat until the sugar has completely dissolved. Add in the corn oil and milk, mixing evenly. Sieve in the cake flour and mix well to form a batter.

2. Prepare two small bowls. Add 1tbsp of batter to a bowl and 2tbsp to the other bowl. Add a small amount of green coloring to the bowl with 1tbsp batter and some red coloring to the bowl with 2tbsp. Add in 1 tsp strawberry powder into the remaining batter.


3. Beat the egg whites in a clean bowl, adding the sugar in a few separate portions. Beat until soft peaks form.

4. Add 1/2tbsp and 1tbsp of meringue to the green batter and red batter respectively, then transfer the batter to pipping bags.


5. Pipe out the strawberry pattern onto the lined baking tray, then bake in a preheated oven at 150°C for a minute.


6. Mix the strawberry batter with the remaining meringue, then pour the batter into the baking tray with the strawberry pattern. Flatten the batter, tap it lightly on the tabletop and bake at 160°C for 15 - 20 minutes. Once out of the oven, immediately invert and remove the baking paper.

7. When the cake has completely cooled, flip it over so that the strawberry pattern is at the bottom, then spread the whipped cream topping filling on top of the cake. Scatter slices of fresh strawberry on the cream, then roll up the swiss roll, wrap it with foil and refrigerate for at least half an hour before serving.

~~~Different ovens may have slight differences in the temperature, so do adjust accordingly.~~~


 这回的草莓卷味道可口,这得归功于朋友JP送的草莓粉。
浓郁的鲜草莓味和自然的草莓色,
跟之前自己买的,品质上差好多,
谢谢你朋友,感恩哦!


生日快乐!亲爱的娜娜!
祝福你, 喜悦满满!


I'm also joining Little Thumbs Up - June'15 Event : Cream
Organized by 
Hosted by :
I'm submitting this post to the Best Recipes for Everyone
June15 event: Secret of Chiffon & Swiss Roll
organized and hosted by Fion of XuanHom's Mom

2015年6月12日星期五

豹纹咖啡蛋糕卷 (Coffee Leopard Pattern Swissroll)


老早就想卷的豹纹蛋糕卷。
这次不是朋友你的相约,我看还在“待做名单”排着队呢!
所以,朋友谢谢你的相约,不但身上的懒虫被赶走了,
还清了一则待做名单。


太久没有卷蛋糕了,手势也生疏,
所以勤能补拙是成立的,孰能生巧,更是不容置疑。


豹纹咖啡蛋糕卷
模具:11寸 x 8寸烤盘
材料:
蛋黄 。。55克
蛋白 。。130克
幼糖 。。30克(加入蛋白中)
幼糖 。。35克(加入蛋黄中)

即溶咖啡粉 。。1茶匙
粟米油 。。35克
牛奶 。。45克
低筋面粉 。。70克
 
一些巧克力粉

咖啡内陷:
适量鲜奶油 + 糖粉 + 咖啡精华液(打发)

做法:
1。蛋黄加入幼糖拌匀至糖溶化,加入粟米油,即溶咖啡粉,牛奶拌匀成咖啡糊。筛入低筋粉拌匀。
2。准备2个小碗,分别加入1汤匙和2汤匙的做法(1)面糊。取适量的可可粉调入小分量的碗内;另外再取适量的黑可可粉调入大分量的碗内。(最后会拿到三个不同层次的褐色)。


3。蛋白分次加入幼糖,打至湿性发泡的蛋白霜。
4。将 1汤匙的蛋白霜加入中褐色糊拌匀盛入挤花袋;将2汤匙蛋白霜加入深褐色面糊拌匀盛入挤花袋。
5。 开始跟着印图挤出豹纹,然后放入预热烤箱,150'C 烤1分钟。


6。将剩余(浅褐色)的面糊和剩余的蛋白霜拌匀,倒入烤好豹纹的烤盘,抹平,震几下烤盘,放入预热烤箱,170'C,约15-20分钟,出炉后撕开油纸。
7。将 作法(6 )涂上一层薄薄的咖啡内馅(涂在没有豹纹的一面),将它卷起后,用锡纸包好,放入冰箱冷藏半小时即可。
~~~烤箱温度不一,请根据自己烤箱的热度~~~


Coffee Leopard Pattern Swissroll
Uses an 11 x  8 inch baking tray.

Ingredients:
55g egg yolk
130g egg white
30g caster sugar (added to the egg white)
35g caster sugar (added to the egg yolk)

1tsp instant coffee powder
35g corn oil
45g milk
70g cake flour

Some cocoa powder

Coffee cream filling:
Beat some whipping cream with icing sugar and coffee essence.

Method:
1. Add the caster sugar to the egg yolk and beat until the sugar has completely dissolved. Add in the corn oil, instant coffee powder and milk, and mix evenly. Sieve in the cake flour and mix well to form a coffee batter.
2. Prepare two small bowls. Add 1tbsp of coffee batter to a bowl and 2tbsp to the other bowl. Add a small amount of cocoa powder to the bowl with 1tbsp batter and a larger amount to the bowl with 2tbsp, so that you end up with three bowls of batter with different shades of brown.


3. Beat the egg whites in a clean bowl, adding the sugar in a few portions. Beat until soft peaks form.
4. Add 1tbsp and 2tbsp of meringue to the medium brown batter and dark brown batter respectively, then transfer the batter to pipping bags.

5. Pipe out the leopard print into the lined baking tray, then bake in a preheated oven at 150°C for a minute.


6. Mix the light brown batter with the remaining meringue, then pour the batter into the baking tray with the leopard print. Flatten the batter, tap it lightly on the tabletop and bake at 170°C for 15 - 20 minutes. Once out of the oven, immediately invert and remove the baking paper.
7. When the cake has completely cooled, flip it over so that the leopard print is at the bottom, then spread the coffee cream filling on top of the cake. Roll up the swiss roll, wrap it with foil and refrigerate for at least half and hour before serving.

~~~Different ovens may have slight differences in the temperature, so do adjust accordingly.~~~


I'm also joining Little Thumbs Up - June'15 Event : Cream
Organized by 
Hosted by :
I'm submitting this post to the Best Recipes for Everyone
June15 event: Secret of Chiffon & Swiss Roll
organized and hosted by Fion of XuanHom's Mom

2013年12月17日星期二

圣诞节树桐蛋糕 (Christmas Yule Log Cake)

12月中,圣诞近,此时在北地球一带,
应该是白雪飘飘,一片白茫茫的。。。。。
这才是如诗如梦的白色圣诞。
可惜我身在赤道的马来西亚,不但没有雪花飘飘,
还被高温的气候笼盖着,丝毫没有一点诗情画意。


这圣诞树桐蛋糕早在网上已屡见不鲜,
可是很喜欢圣诞节的安迪,还是预早的把它给弄出来,
以弥补我无法亲临冰天雪地的遗憾,
自得其乐,幻想和陶醉一番。

2013年10月15日星期二

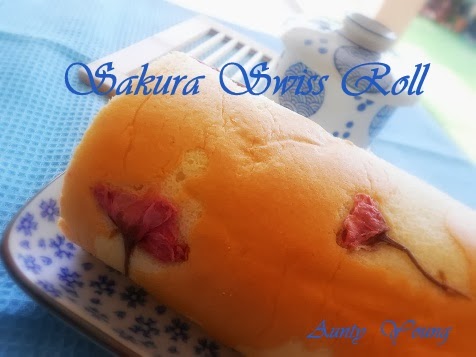
樱花蛋糕卷(Sakura Swiss Roll)

终于这富有和风气息的蛋糕卷,在安迪的家出现了。 
其实盐渍樱花一早就已经在冰箱里冬眠了一段日子,
一直提不起勇气来开炉,深怕早在网界闻名优雅的蛋糕卷,
一旦让我搞扎,会误导及破坏樱花蛋糕卷的高雅形象。
这次的成品虽然还不算十全, 但总算了了心愿,
谢谢我最亲爱的Na Nak,
因为你的鼓励,你的参与,
我们共同完成这好看的蛋糕卷。

  原来盐渍樱花,不但漂亮,
轻微的咸味,有提升蛋糕的美味呢!


食谱参考  :甜姐儿(Joceline Lyn)
蛋糕体材料:..........................cake ingredient : 

蛋黄 - 3个...............................3 egg yolk
粟米油 - 20克..........................20g corn oil
鲜奶 - 50克.............................50g fresh milk
Vanilla香精 - 1/2茶匙...............1/2 tsp vanilla essence
低筋面粉 - 50克......................50g superfine flour
粟米粉 - 10克.........................10g corn flour

蛋白 - 3个...............................3 egg  white
细砂糖 - 60克..........................60g castor sugar

桜花漬 - 数朵..........................few salted Sakura flower
(泡水扭干待用)......................(soaked into water,drained it put aside)

内馅:..........................................filling :

植物性鲜奶油 150克............................... 150g fresh cream
草莓泥 - 2汤匙.........................................2tbsp strawberry paste
(把鲜奶油打发。再拌入草莓泥搅拌至均匀。)
(Whisk the fresh cream till stiff, add in strawberry paste,then mixed well.)

蛋糕做法:...................................method:

1) 蛋黄打散后,加入油搅拌均匀,然后加入鲜奶一起拌匀。
1.  Beat the  egg york,corn oil,and fresh  milk until fluffy.

2)  加入香草精,再筛入粉类搅拌成均匀的蛋黄面糊。
2.  Add in vanilla essence, shift in superfine flourand corn flour then mix it until smooth and well combined, put aside.

3) 蛋白打起泡,分次加入细砂糖打至湿性发泡。
3.  Whisk egg white till frothy, add 1/3 of sugar . Continue to beat and add remaining sugar in 2 sessions and beat till stiff peak。

4)把蛋白霜分次加入蛋黄面糊里搅拌至均匀。
4.  Fold in 1/3 of the meringue to egg yolk mixture, fold till just incorporated. Repeat the same for the remaining meringue to form a smooth batter.

5)把桜花漬数朵摆在铺了纸的烤盘上,然后将面糊倒入铺平。
5. Scatter the sakura flowers on a lined baking tray,  then pour in the batter.

6)把起泡敲出后,送入预热后的烤箱里,170烘烤20分钟。
6.  Bang it on tabletop twice to release air bubbles.  Bake in preheated oven at 170C for about 20 mins.

7)将蛋糕取出后翻转,将蛋糕纸慢慢的撕开。(有樱花的面向上)蛋糕放着待凉。
7.  Invert the cake once remove from oven, then slowly remove the liner.  Cool the cake with sakura flower upward on rack.

8)把蛋糕放在一张纸上,(樱花面下)将奶油涂上,用刮刀把奶油铺平,将蛋糕卷上。
8) Now, place the cake on a greaseproof paper, (sakura flower facing downward) spread the filling on it, then roll up the cake.

9)把蛋糕卷放入冰箱30分钟后,让蛋糕定型才取出切开享用。
9) Keep the swiss roll into fridge and chilled for 30 minutes, Once firm,slice to serve.

 
 衷心的谢谢甜姐儿的分享,
因为这蛋糕体,松软细绵,
很棒的食谱,谢谢!


@@@@@@@@@@@

2013年6月26日星期三

枫叶蛋糕卷 (Maple Leaf Swissroll)

这也是Na Nak生日当天的拙作,
枫叶向来是她喜爱的叶子。
因此当我说要消灭剩余的奶油霜时,
就快快从网上找来这枫叶图。


比起小蘑菇,枫叶简单多了,
一个颜色,一下就敲定,蛋白也没机会消泡,
因此出来成品,也较松软好吃多了。


照片里,那瓶枫叶型的maple syrup,
 是一位朋友,在一次加拿大旅游带回来的手信,
安迪就应景的让它亮相了,
谢谢你,Grace。


好玩的Na Nak 又发挥她的鬼马才华,
从院子摘来木瓜叶,说是热带国度的枫叶,还要是青绿色的,
难得她满怀热情,安迪只好配合,发挥一下我的想象力,
木瓜叶啊!你就暂时是枫叶吧!
安迪难得糊涂,就让她偶尔指鹿为马吧!


枫叶蛋糕卷 (Maple Leaf Swissroll)

模具:11寸 x 8寸烤盘
材料:
蛋黄 。。40克
蛋白 。。120克
幼糖 。。20克(加入蛋白中)
幼糖 。。26克(加入蛋黄中)
粟米油 。。30克
牛奶 。。45克
低筋面粉 。。55克
 
食用橙色素。。。。适量

内陷:
适量鲜奶油 + 糖粉(打发)
适量的罐头红豆粒

做法:
1) 蛋黄加入幼糖拌匀至糖溶化,加入粟米油,牛奶拌匀,筛入低粉拌匀。
2) 蛋白分次加入幼糖,打至湿性发泡。
3) 将 1和 2 混合,轻轻翻拌均匀成细腻面糊。
4) 舀出3汤匙细腻面糊,加入食用橙色素,搅拌均匀,盛入挤花袋,开始跟着印图挤出枫叶图纹,然后放入预热烤箱,150°C 烤1分钟。


5) 将剩余的面糊,倒入烤好枫叶图纹的烤盘,抹平,震几下烤盘,放入预热烤箱,150度,约15-20分钟,出炉后撕开油纸。
6)  将 作法(5 )涂上一层薄薄的鲜奶油和铺上红豆粒(涂在没有枫叶图纹的一面),将它卷起后,用锡纸包好,放入冰箱冷藏半小时即可。

~~~烤箱温度不一,请根据自己烤箱的热度~~~


Tray: 11" x 8"

Ingredients:
Egg white ----------------------------------------------------------- 120g
Castor sugar -------------------------------------------------------- 20g (to be mixed with the egg white)
Egg yolk ------------------------------------------------------------ 40g
Castor sugar -------------------------------------------------------- 26g (to be mixed with the egg yolk)
Corn oil ------------------------------------------------------------- 30g
Fresh milk ----------------------------------------------------------- 45g
Superfine flour ------------------------------------------------------- 55g (sieved)
Orange food coloring ------------------------------------------------ A few drops

Filling:
Whipping cream and icing sugar, as required (whipped)
Canned kidney beans, as required

Method:
1. Mix egg yolk and castor sugar until even, then add in corn oil and fresh milk before adding in the sieved superfine flour.
2. Add 1/3 of the castor sugar into the egg white and whisk till frothy. Continue to beat and add remaining sugar in 2 sessions. Beat till the egg white forms stiff peaks.
3. Mix the egg white meringue from (1) with the egg yolk mixture in (2) until it forms a smooth batter.
4. Scoop out 3 spoonfuls of batter and add in the orange food coloring. Place the orange batter into an icing bag and pipe onto the lined baking tray according to the picture. Bake it at 150°C in a preheated oven for 1 minute.
5. Pour the remaining batter into the baking tray, bang it on a flat surface to rid the batter of bubbles, then bake it at 150°C in a preheated oven for 15-20 minutes. Once out of oven, slowly remove the baking paper.
6. Spread the whipping cream on the side without picture, then scatter the kidney beans onto the cream. Roll the cake and wrap in baking paper, then refrigerate for 30 minutes.


相比小蘑菇,因为彩绘较复杂,耽搁了时间,
结果影响到蛋白糊消泡,蛋糕体就欠松软。

 而枫叶图文简单,单一颜色,
快速完成,蛋白糊保持硬性发泡。
结果就如相片中的模样,绵软饱满,
口感超棒的! 

@@@@@@@@@@@@@@@@@@@@@

2013年6月25日星期二

小蘑菇蛋糕卷 (little mushroom swissroll)


昨天,像往常一样,一早陪着Na Nak骑脚踏车,上学去。
可是,一路上,一个人影也没有,一辆车也不见,感觉怪怪的,
心理开始怀疑,难道今天是公假????

结果不放心,在脚踏车亭稍等Na Nak,
果然没多久,只见她一脸迷惑告知,校门关闭,校园不见人影。
就在这时,一位正晨运经过的男生,
好心告诉我们因为烟霾指数超标,昨晚新闻已报为校假了。
(我和安哥宋昨晚因为赴了邻居的喜宴,而错失这段新闻)

 对这突如其来的消息,咱们母女俩真是啼笑皆非。
早知就不必这么早起床,还要比别人吸进多余的烟霾污气,
不过很快的,我们就开心起来了,因为昨天刚好是Na Nak的生日,
Yeah! 回家做生日蛋糕去!

原本想乘她上学时刻,做个简单的巧克力相思给她惊喜,
结果变成母女俩一起做,她要求的小蘑菇蛋糕卷,
虽然感觉怪怪的,但是寿星女最大,只好依了她。

********************************************************************


小小蘑菇,有没有可爱啊


问Na  Nak 近来咱们家蛋糕卷做得勤,不腻吗?
她说: “才不呢!好吃得很,” 所以坚持要做蛋糕卷。


鬼马的Na Nak 找来陶瓷蘑菇道具来应景,
看她还真玩得挺开心的。


小蘑菇蛋糕卷 (little mushroom swissroll)


模具:11寸 x 8寸烤盘
材料:
蛋黄 。。40克
蛋白 。。120克
幼糖 。。20克(加入蛋白中)
幼糖 。。26克(加入蛋黄中)
粟米油 。。30克
牛奶 。。45克
低筋面粉 。。55克
 
红蘜粉。。。。1/2茶匙
绿茶粉。。。。1/4茶匙

内陷:
适量鲜奶油 + 糖粉(打发)
适量的罐头红豆粒

做法:
1) 蛋黄加入幼糖拌匀至糖溶化,加入粟米油,牛奶拌匀,筛入低粉拌匀。
2) 蛋白分次加入幼糖,打至湿性发泡。
3) 将 1和 2 混合,轻轻翻拌均匀成细腻面糊。
4) 分别舀出2汤匙细腻面糊,1汤匙加入红蘜分,1汤匙加入绿茶粉,分别搅拌均匀,盛入挤花袋,开始跟着印图挤出小蘑菇图,然后放入余热烤箱,150‘C 烤1分钟。


5) 将剩余的面糊,倒入烤好小蘑菇图的烤盘,抹平,震几下烤盘,放入预热烤箱,150度,约15-20分钟,出炉后撕开油纸。
6)  将 作法(5 )涂上一层薄薄的鲜奶油和铺上红豆粒(涂在没有小蘑菇图的一面),将它卷起后,用锡纸包好,放入冰箱冷藏半小时即可。

~~~烤箱温度不一,请根据自己烤箱的热度~~~


Tray: 11" x 8"

Ingredients:
Egg white ----------------------------------------------------------- 120g
Castor sugar -------------------------------------------------------- 20g (to be mixed with the egg white)
Egg yolk ------------------------------------------------------------ 40g
Castor sugar -------------------------------------------------------- 26g (to be mixed with the egg yolk)
Corn oil ------------------------------------------------------------- 30g
Fresh milk ----------------------------------------------------------- 45g
Superfine flour ------------------------------------------------------- 55g (sieved)
Red fermented rice powder ------------------------------------------ 1/2tsp
Green tea powder --------------------------------------------------- 1/4tsp

Filling:
Whipping cream and icing sugar, as required (whipped)
Canned kidney beans, as required

Method:
1. Mix egg yolk and castor sugar until even, then add in corn oil and fresh milk before adding in the sieved superfine flour.
2. Add 1/3 of the castor sugar into the egg white and whisk till frothy. Continue to beat and add remaining sugar in 2 sessions. Beat till the egg white forms stiff peaks.
3. Mix the egg white meringue from (1) with the egg yolk mixture in (2) until it forms a smooth batter.
4. Scoop out 2 spoonfuls of batter and add in the red fermented rice powder and green tea powder to 1 spoonful each. Place the red and green batter into an icing bag each and pipe onto the lined baking tray according to the picture. Bake it at 150°C in a preheated oven for 1 minute.
5. Pour the remaining batter into the baking tray, bang it on a flat surface to rid the batter of bubbles, then bake it at 150°C in a preheated oven for 15-20 minutes. Once out of oven, slowly remove the baking paper.
6. Spread the whipping cream on the side without picture, then scatter the kidney beans onto the cream. Roll the cake and wrap in baking paper, then refrigerate for 30 minutes.


 Na  Nak 要求要多多红豆粒,
结果安迪拼命把红豆往蛋糕里卷。

2013年6月21日星期五

四叶草纹蛋糕卷( Four Leaf Clover swissroll)

四叶草的花语是幸福。
学名苜蓿草,是多年生草本植物,一般只有三片小叶子,
叶形呈心形状,叶心较深色的部分亦是心形。


传说,在十万株苜蓿草中,
可能只会发现一株是‘四叶草’,因为机会率大约是十万分之一。
因此‘四叶草’是国际公认为幸运的象征。


它的每片叶子都有着不同的意义,
当中包含了人生梦寐以求的四样东西:
名誉、财富、爱情及健康,倘若同时拥有这些东西,
那就是幸运了。


【花语】
四叶草(幸运草)---Four Leaf Clover
第一片叶子代表真爱 (love)
第二片叶子代表健康 (health)
第三片叶子代表名誉 (glory)
第四片叶子代表财富 (riches)


四叶草纹蛋糕卷( Four Leaf Clover swissroll)


模具:11寸 x 8寸烤盘
材料:
蛋黄 。。40克
蛋白 。。120克
幼糖 。。20克(加入蛋白中)
幼糖 。。26克(加入蛋黄中)
粟米油 。。30克
牛奶 。。45克
低筋面粉 。。55克
 
绿茶粉。。。。1/2 茶匙

内陷:
适量鲜奶油 + 糖粉(打发)
适量的罐头红豆粒

做法:
1) 蛋黄加入幼糖拌匀至糖溶化,加入粟米油,牛奶拌匀,筛入低粉拌匀。
2) 蛋白分次加入幼糖,打至湿性发泡。
3) 将 1和 2 混合,轻轻翻拌均匀成细腻面糊。
4) 舀出3汤匙细腻面糊,加入绿茶粉,搅拌均匀,盛入挤花袋,开始跟着印图挤出四叶草花纹,然后放入余热烤箱,150‘C 烤1分钟。


5) 将剩余的面糊,倒入烤好四叶草花纹的烤盘,抹平,震几下烤盘,放入预热烤箱,150度,约15-20分钟,出炉后撕开油纸。
6)  将 作法(5 )涂上一层薄薄的鲜奶油和铺上红豆粒(涂在没有四叶草纹的一面),将它卷起后,用锡纸包好,放入冰箱冷藏半小时即可。

~~~烤箱温度不一,请根据自己烤箱的热度~~~


Tray: 11" x 8"

Ingredients:
Egg white ----------------------------------------------------------- 120g
Castor sugar -------------------------------------------------------- 20g (to be mixed with the egg white)
Egg yolk ------------------------------------------------------------ 40g
Castor sugar -------------------------------------------------------- 26g (to be mixed with the egg yolk)
Corn oil ------------------------------------------------------------- 30g
Fresh milk ----------------------------------------------------------- 45g
Superfine flour ------------------------------------------------------- 55g (sieved)
Green tea powder --------------------------------------------------- 1/2tsp

Filling:
Whipping cream and icing sugar, as required (whipped)
Canned kidney beans, as required

Method:
1. Mix egg yolk and castor sugar until even, then add in corn oil and fresh milk before adding in the sieved superfine flour.
2. Add 1/3 of the castor sugar into the egg white and whisk till frothy. Continue to beat and add remaining sugar in 2 sessions. Beat till the egg white forms stiff peaks.
3. Mix the egg white meringue from (1) with the egg yolk mixture in (2) until it forms a smooth batter.
4. Scoop out 3 spoonfuls of batter and add in the green tea powder. Place the orange batter into an icing bag and pipe onto the lined baking tray according to the picture. Bake it at 150°C in a preheated oven for 1 minute.
5. Pour the remaining batter into the baking tray, bang it on a flat surface to rid the batter of bubbles, then bake it at 150°C in a preheated oven for 15-20 minutes. Once out of oven, slowly remove the baking paper.

6. Spread the whipping cream on the side without picture, then scatter the kidney beans onto the cream. Roll the cake and wrap in baking paper, then refrigerate for 30 minutes.


绿茶配红豆粒,超搭的。
赞!


Related Posts Plugin for WordPress, Blogger...