显示标签为“Cupcakes (杯子蛋糕)”的博文。显示所有博文

2020年12月8日星期二

麋鹿巧克力小蛋糕 Reindeer Chocolate Cup Cakes


圣诞月的到来,到处都见麋鹿的踪影。。。。。。

2020年2月6日星期四

香蕉海绵杯子蛋糕 (Spongy Banana Cupcakes)


想念海绵蛋糕了。。。。。

2019年4月30日星期二

巧克力杏仁粒杯子蛋糕 (Almond nut Chocolate Cupcakes)


4月30号,
紧捉住4月的尾巴,上了此月最后一个贴。


这个巧克力蛋糕,糕体湿润,
充满浓郁的巧克力香气,
加上烤香的杏仁粒,
好吃自然不在话下。

2017年11月21日星期二

香蕉核桃海绵杯子蛋糕 ( Spongy Banana Walnut Cupcakes)


最近家里人口少了,连香蕉的食量也慢了下来,
眼看挂在吊架上的香蕉烂黑黑的,
快快翻查食谱,烤起香蕉海绵蛋糕来。


用会一直都很满意的食谱
只是稍微更改,因为这次的香蕉熟透了,超甜的说。
所以糖份减少一些。

再来,懒得洗烤模,懒得切片,
同样的食谱,全部倒入纸杯,
适度的调换温度和烘焙时间,
结果,出来成品依然叫人满意。


蛋糕充满香蕉和核桃的香气。。。。。


蛋糕体绵密松软。。。。。


整体来说,就是好好吃!!


香蕉核桃海绵蛋糕
模具 :15杯 小蛋糕
食谱参考: 这里

材料 :
蛋(中型)   3个
细砂糖       120克(减至110克)
熟香蕉       200克(切小块)
低筋粉       150克
发粉            1/2茶匙
苏打粉        1/4茶匙
粟米油        100克

烤香核桃     80克

做法 :
1。 预热烤箱180'C.
2。 将所有的分类筛2遍,置旁待用。
3。 用蛋糕搅拌器将蛋,细砂糖和香蕉块,以高速搅打至浓稠。
4。  拌入筛过的分类,拌匀。
5.    加入粟米油,搅拌均匀成顺滑的面糊.。
6。 将面糊舀入准备好的纸杯,撒上适量的烤箱核桃。
7.    送入已余热烤箱,烤约25-30 分钟。(各人烤箱温度不一,请自行调整温度与时间)


高速搅打至浓稠的面糊。
With max speed  until get the stiff batter..


Spongy Banana Walnut Cupcakes
Utensil :15 paper liner

Recipe adapted from : Here 

Ingredients :
3 eggs (medium)
120g sugar (reduced to 110g)
200g banana (ripe & cut into small pieces)
150g cake flour
1/2 tsp baking powder
1/4 tsp baking soda
100g corn oil

80g   Toasted walnuts

Method:
1. Preheat oven to 180 degree C.
2. Sieve flour, baking powder & soda together. Sieve twice & set aside.
3. Beat eggs, sugar & banana at max speed in a mixer till stiff.
4. Fold in flour & mix well.
5. Add in corn oil & mix well till batter is shiny & flowing.
6. Scoop the batter into prepared paper liner, scatter some toasted walnuts on the top.
7. Bake for 25- 30mins.


偶尔偷懒,换上纸杯,省了洗涤烤模的功夫,

也免了切片的麻烦,
一杯蛋糕,一杯咖啡,
简单但满意的下午茶。。。。。。


@@@@@@ Enjoy ! @@@@@@


2017年5月21日星期日

Coffee Hokkaido Milk Chiffon Cupcakes (咖啡北海道牛奶戚风杯子蛋糕)


Recently, I stumbled upon this lovely cupcake liner while I was restocking at the baking supplies shop and couldn't help bringing it home. 

2016年11月2日星期三

黑芝麻杯子蛋糕 (Black Sesame Cupcakes)


 早安,开心星期三!
早安,快乐十一月!
我“肥”来了!

2016年7月22日星期五

柠檬乳酪杯子蛋糕 (Lemon Cheese Cupcakes)


 近来,安迪又犯散漫,
这个杯子蛋糕是迟交的功课,
希望好姐妹大人有大量,不要见怪。
呵。。。呵。。。。


2016年6月24日星期五

薰衣草杯子蛋糕 (Lavender cupcakes)


 安家有女初长成。。。。。
今天是娜娜的生日,原本是没有准备生日蛋糕的,
因为问她想吃什么蛋糕?
她竟然反问,可以不要蛋糕,要妈妈裹的粽子

2015年12月20日星期日

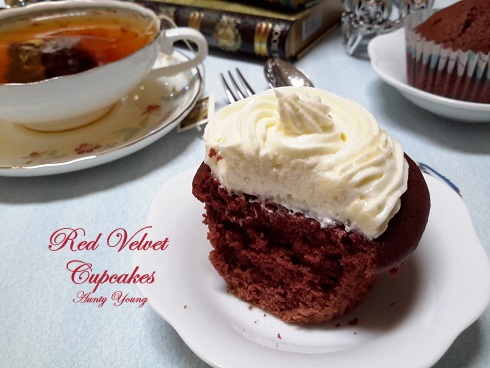
红丝绒杯子蛋糕 (Red Velvet Cupcakes) - 金马伦之宝锡兰红茶之旅 (Cameron Trip : Basilur Ceylon Tea)


首先我要为我的“误导”道歉,
对不起,这个是不很正宗的红丝绒杯子蛋糕 ,
因为我少放1/2茶匙的红色素,所以出来的效果红色不足,
有愧它“红丝绒”的雅称。


虽然蛋糕外没有预期的红当当的娇艳,但是美味可口是绝对的!
上层装饰的乳酪奶油,顺滑兼带柠檬香气,
让这蛋糕吃起来甜而不腻,湿润又口感丰富;
加上原本带红的外貌,更加喜庆感满满, 
是一款值得推荐的应节蛋糕!


湿润的巧克力蛋糕体,搭上柠檬香气的乳酪奶油霜,
妙不可言!


一般吃这类代奶油霜的蛋糕,安迪都会搭上一杯红茶。
这回是安家刚从金马伦带回的世界名红茶 - 
宝锡兰(Basilur)典藏书造型的水果茶(Pyramid Tea Bags in Tea Book)
(往下看会有更多有关宝锡兰红茶的分享)


红丝绒杯子蛋糕
食谱参考 :韵的美丽人生

材料:
A) 低筋面粉 150g,发粉 1/2 tsp,盐 1/4 tsp, 可可粉 1大匙
B) 红色素 1/2 tsp+ 1/2 tsp,酪奶(Buttermilk) 125ml
C) 无盐牛油 60g (室温软化), 细白糖 100g,鸡蛋 1个,香草香精 1/2 tsp
D) 白米醋 1/2 tsp,苏打粉 1/2 tsp


**如果没有酪奶(Buttermilk) 也可以把1/2大匙柠檬汁加入牛奶里,静置10分钟后即可使用。
   详情可参照这里

做法:

1) 材料A混合过筛
2) 红色素加入buttermilk内,搅拌均匀
3) 将牛油和白糖搅拌至松发泛白,慢慢分次加入鸡蛋搅拌均匀后再加入香草香精
4) 分次轮流加入粉类和buttermilk,搅拌均匀
5) 将苏打粉加入白米醋内直到看到泡泡,立刻加入面糊内,搅拌均匀
6) 倒入纸杯,放入预热后的烤箱,160度烤30-35分钟 (温度时间仅供才参考)


乳酪奶油霜:

乳酪 150g,奶油 30g,糖粉 40g,柠檬汁 1tbsp

1) 乳酪和奶油室温软化后,加入糖粉以搅拌机搅拌均匀至光滑
2) 再加入柠檬汁拌匀,放入冰箱一会儿才使用


Red Velvet Cupcakes
Recipe adapted from : 韵的美丽人生

Ingredients:
A) 150g cake flour, 1/2 tsp baking powder, 1/4 tsp salt, 1 tbsp cocoa powder
B) 1/2 tsp + 1/2 tsp red food colouring, 125ml buttermilk
C) 60g unsalted butter (room temperature), 100g caster sugar, 1 egg, 1/2 tsp vanilla essence
D) 1/2 tsp white rice vinegar, 1/2 tsp baking soda

**If you don't have buttermilk, you can always add 1/2 tbsp of lemon juice to milk and leave it to stand for 10 minutes before using it as buttermilk.

Method:
1. Sieve ingredients A together.
2. Add the red food colouring to the buttermilk.
3. Beat the butter and sugar until light and fluffy, add in the egg in a few additions, then add the vanilla essence.
4. Alternate adding the powder from step 1 and buttermilk from step 2. Mix evenly.
5. Add the soda powder to the vinegar. When it froths up, immediately add it to the batter and mix evenly.
6. Pour the batter into the paper cups and bake in a preheated at 160°C for 30-35 minutes(adjust the time and temperature according to individual ovens).


Cream cheese frosting:

150g cream cheese, 30g butter, 40g icing sugar, 1tbsp lemon juice

1. Warm the cream cheese and butter at room temperature. Beat them with icing sugar until smooth.
2. Add in the lemon juice and mix evenly, then refrigerate the cream for awhile before use.


Linking this post to Cook & Celebrate : Christmas 2015 event hosted by Bake For Happy Kids , Goody Foodies The Domestic Goddess Wannabe .


*************************************

这次金马伦行,机缘之下,关顾一家茶庄- NEPENTHES ENTERPRISE.
它家是全马唯一一家代理 宝锡兰(Basilur)
世界闻名第一红茶品牌。

Basilur(宝锡兰),起源于1867年,是斯里兰卡的第一红茶品牌,它选用不同海拔高低的茶叶来制成不同风味的混合茶并选用最先进的机器设备,来保存茶叶的新鲜度跟品质,一直以来都是以「生产 地球上最好的茶」为经营宗旨。同时它在包装的创新设计上也受到许多人的喜爱,很多人甚至会去收集每一次BASILUR推出的精致设计铁罐当珍藏或者是当家 饰品


茶庄里头有很多别致有趣的系列包装茶叶。
比如,圣诞屋,音乐盒,蜡烛,典藏书,冬季礼品,新年礼品。。。。
超萌的!!!

在众多不同系列茶叶中,有款典藏书系列  超吸引我的的!
一开始我还想這是在卖精裝书吗?
Basilur不是茶叶的品牌吗?
呵呵。。。 果然里面是裝有水果茶叶滴


瞧!多精致的典藏书!
太喜欢了!简直就是一见钟情!


此书其实是全身铁制品。
手工细致,颜色鲜艳,图文清晰,
不止好看,开关顺紧,
精美的包装本身就是很好的保存茶叶的容器。


铁书一旦打开,里边再有一包精致密封的茶封。
茶封本身设有开后自动可以再密封的设计也保持茶叶的新鲜。


茶封里边一共有5包这款独特,金字塔造型的茶袋。
茶叶里也加入莓果,瓜等的萃取物。
以致泡出来的茶,芳香扑鼻,
喝起来味道十分温润,神秘而优雅。 

高科技的萃取和收藏,使到茶叶香气浓郁,
翻泡数度,还是茶香弥留!


一本精致的典藏书,内含5包金字塔水果茶包,只卖RM19.00。
个人觉得很实惠公道。
如果你也喜欢,改天有到金马伦,不妨也去参观。

NEPENTHES ENTHEPRISE
No 25, Jalan Besar,
39100Brinchang,
Cameron Highlands, Pahang.

Tel : 05-4915362


2015年9月8日星期二

百香果乳酪杯子蛋糕 Passion Fruit Cheese Cupcakes


相知恨晚!
说的就是我与百香果。
哈。。。。。不怕笑话了,安迪还真的第一次吃百香果,

几年前,朋友曾经给过这百香果,当时厨艺尚浅的我;
也没找“谷哥”问路的习惯。
当时手握此宝却当草,由得它搁在厨房角落,
直到外皮枯皱(其实是成熟香醇),以为坏了,毫不留情,把他给扔掉。
现在想起来,还真的不惜福啊!也辜负了朋友的一番心意,愧疚呢!!!
朋友,一万个对不起hor,都怪我笨拙不懂事, 让你错爱了。


事隔数年,再度重逢,时日的我,对百香果已略有所闻。
所以当May给了我7粒,我如获至宝,快快把它们藏于冰箱,
今天用力5粒,烘了这个非常美味可口的百香果乳酪蛋糕。
剩余的2粒较生涩,等它成熟,再好好的消掉。


或许。。。。人与事都得对的时间,
才能察出漂亮的火花!
就如我与这百香果,第一次相遇不相识;
幸好还有第二次,而且相识恨晚,一试钟情!
在此谢谢媒婆(May),哈。。。哈。。。。


蛋糕体湿润棉滑,
香醇的奶油芝士因为清新的百香果的加入,被中和得香而不腻。
 上层的乳酪霜更是酸酸,甜甜,醒胃呢!

吃了一口,再一口。。。。。。。。
此时此刻,我。。。。忘了什么是卡路里!
天呀!


百香果乳酪杯子蛋糕
食谱参考 : Min's Blog

材料:
奶油 185g
细糖 170g (我减到150g) 
香草精 1tsp
鸡蛋 3个
奶油乳酪 125g
百香果肉 2个
自发面粉 125g
面粉 30g
牛奶 60ml

上层乳酪霜
糖粉 250g (我减到100g)
奶油乳酪 100g
奶油 50g
百香果肉 3个

做法:
1。乳酪霜 :把奶油和奶油乳酪搅拌均匀, 慢慢筛入糖粉, 最后拌入百香果肉, 放入冰箱备用。

2。 用电动搅拌器, 把奶油和细糖打发, 拌入香草精。

3。 徐徐加入蛋液, 搅拌均匀。加入奶油乳酪和百香果肉, 拌匀。最后筛入粉类和牛奶, 拌匀。

4。 将面糊舀入纸杯, 放入预热180‘C的烤箱, 烤20分钟。

5。 蛋糕取出, 待凉后, 用挤花袋,把乳酪霜挤在上面, 放些百香果肉装饰, 即完成。


百香果 Passion fruits


Passion Fruit Cheese Cupcakes
Recipe adapted from : Min's Blog

Ingredients :
Butter 185g
Caster sugar 170g (I reduced to 150g)
Vanilla essence 1tsp
Egg 3个
Cream cheese 125g
Passion fruit flesh 2
Self raising flour125g
Flour 30g
Milk 60ml 

Topping Cream:
Icing sugar  250g (I reduced to 100g)
Cream cheese  100g
Butter 50g
Passion fruit flesh 3
  
method :
1. Topping Cream : Cream the butter and cream cheese until smooth, slowly add in sifted icing sugar, pour in passion fruit flesh and mix well. chill in the fridge for later use.

2. Use electrical mixer,cream the butter and caster sugar, add in vanilla essence.

3. Add in the eggs one at a time and beat evenly. Add in cream cheese and passion fruit flesh,mix well. Lastly  add in sifted flour and milk, mix well.

4. Scoop the batter into the paper cups and bake with preheated oven at 180'C for 20 minutes.

5. Once the cake is cooled, pipe with the topping cream on it and serve.
Add in the eggs one at a time and beat evenly

Copy the BEST Traders and Make Money (One Click) : http://ow.ly/KNICZ


百香果因为有波萝、香蕉、芒果、石榴、
柠檬、草莓、西瓜、酸梅、水蜜桃等10多种水果的浓郁香味,
故得名百香果。其实噢,
 百香果也有爱情果和情人果之称。


@@@@@ Enjoy ! @@@@@

2015年8月15日星期六

巧克力北海道牛奶戚风杯子蛋糕 (Chocolate Hokkaido Milk Chiffon Cupcakes)


这个蛋糕还真的是无心之作。
昨天和朋友谈话间,被邀一起上北海道蛋糕的贴。
当时完全没有心理准备,不敢贸然答应。


今早有到烘焙材料店走一趟,回来已是中午。
心血来潮,敲蛋,搅拌,开炉。。。。。
眼看就要完工,这才想起娜娜的华文班上课时到,
无奈蛋糕虽还差那十来分钟才完成烘焙,也被迫终止。
想着让烤箱的余温继续焗熟它。


幸好回来时,蛋糕没有我想象的收缩下榻。
总算可以顺利赶上"Bake along "的最后一班列车,
哈。。。。。。。朋友,等我哦!


巧克力北海道牛奶戚风杯子蛋糕 
 食谱参考 :  Michelle Heong

(可做10杯)


材料:
蛋黄 80g
牛奶 80g
粟米油 60g
可可粉 20g
低筋面粉 80g

蛋白 160g
细砂糖 90g(以黄糖取代)
塔塔粉 1/4tsp

巧克力奶油馅和装饰:

可可粉2大匙 + 热水3大匙,搅拌均匀备用

动物性鲜奶油150g
细砂糖 20 g
适量糖粉
适量巧克力粒

做法:


1。 把蛋黄打散,加入牛奶,粟米油打至均匀,
加入低筋面粉&可可粉入蛋黄糊里搅拌均匀.


2。将蛋白打出一些泡沫,之后加入1/4tsp的塔塔粉,
然后分三次加入细砂糖打成干性发泡.

3。 把蛋白的1/3加入蛋黄糊里搅拌均匀,之后才把蛋黄糊再次倒入蛋白糊里搅拌均匀,
将拌好的面糊倒入纸杯里,8分满.


4。  烤箱预热130°烤20分钟,之后转150°烤15分钟,最后在以160°烤10分钟即可.


5。  在一个大盆里,加入冰水,然后把装有鲜奶油的搅拌盆放到冰水大盆里。


6。  以中速搅打动物性鲜奶油和细砂糖至软性发泡,加入可可糊,搅拌成均匀的巧克力奶油。


7。   将巧克力奶油装进挤花袋,然后将之挤入冷却后的杯子蛋糕。 最后撒上适量的糖粉和巧克力粒装饰。

Chocolate Hokkaido Milk Chiffon Cupcakes
Recipe adapted from :
Michelle Heong
(Yield 10 cups)
 
Ingredients:
Egg yolk 80g
Milk 80g
Corn oil 60g
Cocoa powder 20g
Cake flour 80g

Egg white 160g
Caster sugar 90g (I replaced with brown sugar)
Tatar powder 1/4tsp

Chocolate cream topping & filling :
2 tbsp cocoa powder  + 3tbsp hot water, mixed well, set aside
150 g whipping cream 
  20 g caster sugar
Some icing sugar
Some chocolate seeds
 
Method:
1. Whisk egg yolks till pale in colour ( about 2 minutes) . Whisk in milk and corn oil till well mixed. add in sifted cocoa powder and cake flour, whisk till well combined, set aside.

2. Beat egg white until foamy, then add in 1/4 tsp tartar powder. Divide the sugar into 3 batches and add in slowly while beating the white until it reaches high peak form.

3. Scoop 1/3 of the egg whites and use a hand whisk to mix it evenly into egg yolk batter. Next fold in balance egg whites in two batches with spatula till well combined. Scoop batter into arrange paper liners to slightly more than 3/4 cup full.

4. Bake in preheated oven (middle rack) 130'C for about 20 minutes, then 150'C 15 minutes, lastly 160'c 10minutes.

5. Prepare some ice water in a basin, place mixing box which contain the whipping cream in it .

6. Beat the whipping cream and caster sugar on medium low speed until soft peak, add in the cocoa mixture, stir till well combine.


7. Scoop chocolate cream into piping bag and pipe the cream into the cool cupcake. When done, dust with some icing sugar and chocolate seeds or decorate as you desire.


时间紧凑,找来脸书网友Michelle的食谱,
因为简单,一目了然。
而且成品出来,也很满意它的美味可口。
谢谢Michelle。


This post is linked to the event Little Thumbs Up (August 2015 Event: Brown Sugar and Molasses), organized by Zoe (Bake For Happy Kids) and Mui Mui (My Little Favourite DIY), hosted byJess (Bakericious).


Related Posts Plugin for WordPress, Blogger...