
8月31日,
马来西亚,国庆日快乐!

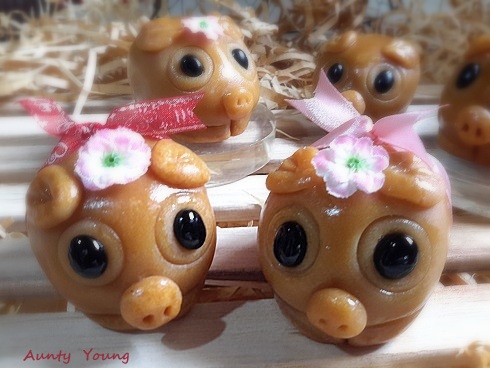
这款非常卡娃依的手模小猪月饼也是6年前,
网上非常火红的分享。
当时安迪还是烘焙新人,经验不足,
只有空欣赏的份,不敢挑战。

谢谢Ann Low 前辈的详细步骤图分享,
让我很顺利的第一次尝试,
就手模出一批可爱精致的小小猪。
就手模出一批可爱精致的小小猪。
因为家人喜欢内馅含坚果,
所以我加了少许的葵花子。

家里没有月饼亮油,我以融化奶油取代,图上一层亮光,
尤其是眼圈部分。

还没戴花系带的小小猪,依然萌萌滴。。。。。。
手模萌萌小猪月饼
(可作5个月饼)
食谱原自 : Anncoo Journal
稍微修改
材料:
150g 普通面粉
90g 糖浆
3g 碱水
38g 花生油
150g 普通面粉
90g 糖浆
3g 碱水
38g 花生油
内馅:
300g 莲蓉内馅
50g 烤香葵花籽
工具:
1个 装饰蛋糕的圆形花嘴
1支牙签
1张朔胶纸袋
1个 装饰蛋糕的圆形花嘴
1支牙签
1张朔胶纸袋
10粒 黑豆
1颗蛋黄 + 1/2茶匙水(搅拌,过滤待用)
月饼亮油
做法:
1。 把糖浆,碱水,花生油拌合均匀,再倒入面粉里,混合均匀成一个面团,然后盖上保鲜纸,休面40分钟。
2。烤香葵花籽和莲蓉内馅拌匀,分成5份(每份70g)。面团分成5份(每份50g),剩余面团,用来做猪耳朵,鼻子和尾巴。
3。 取1 份面团,裹入1 份莲蓉内馅,封口,搓成椭圆形或蛋形。用圆形花嘴印上眼圈,按上黑豆当眼球。用牙签压出嘴形;搓约1克小圆面团,按上当鼻子,再以牙签钻2个鼻孔。
4 。 接着搓出耳朵,按上并以牙签按出耳纹,最后在臀部中下段,以牙签按出一条短线,以面团搓成1条尾巴状,按上即大功告成。
4 。 接着搓出耳朵,按上并以牙签按出耳纹,最后在臀部中下段,以牙签按出一条短线,以面团搓成1条尾巴状,按上即大功告成。
5。 当所有的小猪完成后,除了眼球部分,刷上1层蛋液,送入预热烤箱, 170'C 烤5分钟,取出待冷却约10分钟,(除了眼球部分)再次刷上蛋液,再次送入烤箱,继续烘烤10分钟或至熟。
6。 月饼完全冷却后,全身包裹眼球刷上一层亮油,金光闪闪的萌小猪就呈现了。
小小分享:
~ 面团必须要搓均匀,成品爆裂率较低。
~ 刷蛋液时,不把蛋液刷在眼球部位,是为了成品烤好后,刷上亮油时,眼睛闪亮好看。
~ 最后烘烤10分钟和烤箱温度是可随各家烤箱的情况而做出适当的调整。

过滤蛋黄液,黑豆,牙签,圆形花嘴。
sifted egg yolk,black beans,toothpicks,round shape nozzle

烤香葵花籽和莲蓉内馅拌匀。
Mix the toasted sun flower seed with lotus seed paste well.

烤香葵花籽和莲蓉内馅拌匀,分成5份,每份70g。面团分成5份,每份50g。(我做了双倍食谱,所以图中看到是10 份)。
Mix the toasted sun flower seed with lotus seed paste well, divide them into 5 equal portion, each portion weigh 70g. Divide the dough into 5 equal portion, each portion weigh 50g.
( I made double volume of the recipe, thats why you can see 10 portion in the picture).

取1 份面团,裹入1 份莲蓉内馅,封口,搓成椭圆形或蛋形。用圆形花嘴印上眼圈,按上黑豆当眼球。用牙签压出嘴形;搓约1克小圆面团,按上当鼻子,再以牙签钻2个鼻孔。
Wrap 1 portion of the dough with 1 portion of filling, roll into egg shape. Use the round nozzle to shape the eye ring , press the black beans to be the eye ball. use the toothpick to press the mouth shape, knead 1 little dough to form the nose, use toothpick to poke the nostril.

接着搓出耳朵,按上并以牙签按出耳纹,最后在臀部中下段,以牙签按出一条短线,以面团搓成1条尾巴状,按上即大功告成。
Then knead the ear shape, fix it and use the toothpick to draw the ear print. Turn the piggy around, press 1 short straight line at the bottom, roll a tiny "tail" shape and press above the straight line,
finally the piggy is done !

(Yields 5 Piggy mooncakes)
Recipe origin from : Anncoo Journal
with minor adjustment
Ingredients:
150g flour
90g golden syrup
3g Alkaline water
38g Peanut oil
Filling :
300g Lotus seed paste
50g Toasted sun flower seed
Tools
~ a round piping nozzle, a toothpick and a small plastic sheet.
~ 10 Black beans for eyes
~ Egg wash ~ one egg yolk with 1/2 tsp water, sifted .
~ Mooncake greasing oil
Method :
1. Mix the golden syrup, alkali water and peanut oil well, add in flourand stir- mix to form a smooth dough. Cover with cling wrap to rest for 40 minutes.
2. Mix the toasted sun flower seed with lotus seed paste well, divide them into 5 equal portion, each portion weigh 70g. Divide the dough into 5 equal portion, each portion weigh 50g. The remaining dough use as the ear, nose and tail.
3. Wrap 1 portion of the dough with 1 portion of filling, roll into egg shape. Use the round nozzle to shape the eye ring , press the black beans to be the eye ball. use the toothpick to press the mouth shape, knead 1 little dough to form the nose, use toothpick to poke the nostril.
4. Then knead the ear shape, fix it and use the toothpick to draw the ear print. Turn the piggy around, press 1 short straight line at the bottom, roll a tiny "tail" shape and press above the straight line,
finally the piggy is done !
5. When all the piggy is done, Brush (accept eye ring ) the piggies with egg wash. Bake with preheated oven at 170'C for 5 minutes. Remove from oven to be cool down for 10 minutes. Brush again (accept eye ring ) the piggies with egg wash. Bake again for another10 minutes or until golden in color.
6. After the piggy mooncake completely cool down, coat a layer of greasing oil the whole body including the eye ring of the piggy.
Sharing:
~ Knead the dough nicely will ensure the end products smooth and no cracks
~ Skiped the egg wash for the eye ring is for better out come when finally coated with layer of grease oil. The eyes will look shinning.
~ The oven temperature and the baking time can be adjustable according to individual oven.


制作当儿,没有拍到以牙签压成嘴形的步骤图。
以上这张图片比较清晰展现嘴的构造图。

看着这群可爱的小小猪,
心里的喜悦是非笔墨所能形容的。
有如了了一桩小心愿。。。。。
再次感谢Ann 的无私分享。


再次祝福马来西亚,国泰民安,欣欣向荣!
马来西亚,国庆快乐!
马来西亚,国庆快乐!
马来西亚,布雷(boleh)!
@@@@@ Enjoy ! @@@@@@
好可爱的猪仔月饼,收到的人一定舍不得吃。
回复删除国庆日快乐。
谢谢chen Boon ,对咯。。。尤其是邻家的小女孩,她真的不舍得吃耶。。哈。。哈。。
删除