2021年7月29日星期四

不卡油鲜橙牛油蛋糕 ( Perfect Orange Butter Cake)


不卡油!
蛋糕体湿嫩,绵密!
富有鲜橙奶油香气!
一款美味可口,吃了回味无穷的牛油蛋糕🤤🤤🤤
推荐!


鲜橙牛油蛋糕
(7寸方形烤盘
食谱参阅 :这里

材料 :
250克 奶油 – 置放温室
190克细砂糖(我只用185克)
220克 面粉
1茶匙 泡打粉
4 个蛋
1茶匙  香草精
2个鲜橙削
5汤匙 鲜橙汁

视频 : 参阅这里


解冻鸡蛋和奶油至室温。
Thaw the eggs and butter at room temperature.


预热烤箱175℃
Preheat oven at 175℃


烤模抹油,铺上油纸。
Grease and line the pan.


蓬松顺滑的面糊。
Light and creamy batter.


烤约50 -55 分钟。
Bake for about50 - 55 minutes。


Perfect Orange Butter Cake 
(7 inch square tin)
Recipe refer : Here

Ingredients :
250gram/2 sticks butter – room temperature
190 gram sugar (I used 185g)
220 gram flour
1 tsp baking powder
4 large eggs
1 tsp vanilla essence
Zest of 2 oranges
5 tbsp orange juice (freshly squeezed)


Video refer  : Here 


@@@@@ Enjoy ! @@@@@     


2021年7月25日星期日

简易版酿豆腐 (视频)Simple version Yong Tau Fu(video)


最近口福满满。
邻居分享他家乡做法的简易版酿豆腐于我们。

安迪觉得好食谱,
应该在此记录和分享。


要煮出好吃的酿豆腐,新鲜的食材是关键。


传说酿豆腐源于北方的饺子,因岭南少产麦,思乡的中原客家移民便以豆腐替代面粉,将肉塞入豆腐中,犹如面粉裹着肉馅。 因其味道鲜美,于是便成了客家名菜。 还有一个传说,很久以前,有两个好兄弟,因在一次点菜时发生矛盾,一个要吃猪肉,一个要吃豆腐,后来,聪明的饭店老板想出了一个两全其美的办法,制作出酿豆腐。(资料源自 :酿豆腐的典故


后来为了添加口味,其它食材如:苦瓜,茄子,辣椒,秋葵,豆腐卜。。。。也被拿来取代豆腐酿入内馅。


简易版酿豆腐
供8人份

材料(A)
马鲛鱼绞肉 600g
五花肉绞肉 300g
葱头仔蓉 30克
青葱碎 30克

调味:
麻油 1茶匙
酱油 2茶匙
盐 1茶匙
胡椒粉 适量
粟粉1汤匙匙

材料(B)
茄子 2条,斜切3公分厚片,然后中间切开成蝴蝶状
苦瓜 1 条, 去皮去瓤,切成2公分圆墩。
秋葵 6条,去蒂,打横切开,去籽
辣椒 4条 去蒂,打横切开,去籽
豆腐卜 12个, 中间切开成蝴蝶状

汤汁 :
蒜蓉 30克
清水/高汤 800毫升
盐 1 茶匙
麻油 1/2茶匙
青葱粒30克
适量胡椒粉
适量粟粉 + 水(勾芡)
一些青葱粒

做法 :
1. 将所有材料(A)和调味料一起顺时钟方向,搅拌均匀。(约10分钟)

2. 将所有材料(B)酿入适量的酿馅。

3. 热油锅,将所有酿料的酿馅煎至金黄熟香,捞起。

4. 在另一个锅内,热油爆香蒜蓉,加入水/高汤,煮滚。放入所有煎好的酿料,盖上锅盖,小火焖煮3分钟,将酿料舀入碗内,汤汁留锅。

5. 最后将锅内的汤汁,以适量的粟粉和水勾芡,淋在酿料上面,撒上青葱粒,即可享用。


将所有材料(A)和调味料一起顺时钟方向,搅拌均匀。(约10分钟)


如何切除蔬瓜和酿内馅,看这视屏
How to cut the vege and stuff the filling, please refer : here


如何煎炸酿豆腐,请看视频
How to pan fry Yong Tao Fu, please refer the video


汤汁材料
Ingredients of gravy


Simple version Yong Tou Fu
for 8 pax
Video : https://youtu.be/lEdS-NoIfPA

Ingredients(A)
Fish paste 600g
Minced meat 300g
Chopped shallot30g
Chopped spring onion 30g

Seasoning:
Sesame oil 1tsp
Soya sauce 2tsp
Salt 1tsp
Some pepper
Corn flour 1 Tbsp

Ingredients(B)
Egg plant 2, cut the eggplant digonally into 3cm thick, slit it into butterfly
Bitter gourd 1, cut it into 2cm rings and discard the seeds.
Okra 6, slice it lengthwise and clear the seeds
Chili 4 , slice it lengthwise and clear the seeds
Fried beancurd puff, 12, slit it into butterfly

Gravy :
Chopped garlic 30g
Water/broth 800ml
Salt 1 tsp
Sesame oil 1/2tsp
Some pepper
Some corn flour + water (for thickening )
Some cut spring onion

Mehtod :
1. Pour all ingredients (A) and seasoning into a mixing bowl. Stir-mix evenly .(about 10 min)

2. Use a spoon to scoop some filling to fill up all the ingredients (B) to become Yong Tau Foo.

3. Heat up the oil, pan fry all the stuffed Yong Tau Fus until the filling is golden brown. Dish up.

4. In another wok, heat up oil, saute the chopped garlic until fragrant, pour in the water or broth, cook to boil. Put in all the fried Yong Tau Fus, Cover it, simmer them for 3 minutes. Dish up the simmered Yong Tau Fus without the gravy into a bowl.

5. Finally thicken the gravy with some corn flour water. Drizzle the gravy over the Yong Tau Fu, scatter some spring onion, then done !


自家做的酿豆腐,味道真的原汁原味。
口感Q弹,
吃过回味无穷!!!

@@@@@ Enjoy! @@@@@


2021年7月10日星期六

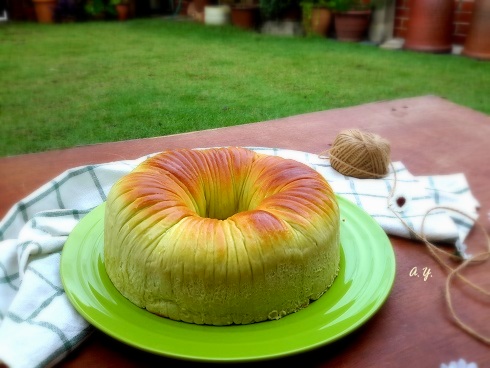
香兰椰丝绒线球面包 (Pandan Wool Roll Bread with Grated coconut)


《香兰椰丝毛线球面包》
严峻的疫情,
动荡不安的社会,
甚至离世的亲友,
有点揪心。

与其埋怨,责怪,无补于事。
不如守好自己,
减少负面的数据。


除了走入大自然,
烘焙的过程,,
也是调剂心情的选择。


将部分鲜奶油换上椰奶,
再把椰糖椰丝替代蔓越莓内馅,
最后再让它披上迷人的香兰绿衣裳。

感觉像是把一个充满奶气的洋妞,
变成一个椰子香气的南海姑娘!
呵。。。呵。。。。想象力丰富的安迪😆😆😆


香兰椰丝绒线球面包

8" 圆形烤模

材料 :
温奶 30ml
即溶酵母 3g
浓缩香兰汁 30ml
高筋面粉 300g
海盐 5g
细砂糖 30g
全蛋 1个 或 55g
动物性鲜奶油 50 ml
椰奶 60ml

内馅:
鲜椰丝 100克
马六甲椰糖 200克,剁碎
香兰叶 2叶
少许盐


做法 :
1. 将温奶和即溶酵母搅拌均匀,置旁待用。

2. 将高筋面粉,海盐和细砂糖倒入搅拌盆,拌匀。

3. 倒入动物性鲜奶油,香兰汁,鸡蛋和做法(1)的酵母温奶液,驱动面团搅拌机,中速搅拌成顺滑的面团。盖上保鲜膜,休面60分钟或发至双倍大。

4. 在一个小煲内,放入鲜椰丝和香兰叶,小火翻炒至微干芳香,加入椰糖碎,翻炒均匀,调入适量的盐,铲起,置旁待用。

5. 8"圆形烤模涂上一层油,底面铺上油纸备用。

6. 工作台上,撒些面粉,将发酵好的面团分割成5等份。每份搓成球状,盖上保鲜膜,休面10分钟。

7. 取一份小面团,压扁,以擀面棍擀成椭圆形,用刮板将一半的体积切割成丝状。另一半舀入1汤匙椰丝内馅,左右两边面团向中间裹,然后卷起来,成毛线球状。将之排放到烤模里。重复同样步骤,直到完成所有面团。盖上保鲜膜,进行 最后发酵约40分钟或双倍大。

8. 表层涂上牛奶液,送进预热烤香190'C 烤约20分钟或呈金黄色即可。


取一份小面团,压扁,以擀面棍擀成椭圆形,用刮板将一半的体积切割成丝状。另一半舀入1汤匙椰丝内馅,左右两边面团向中间裹,然后卷起来,成毛线球状。


排放到烤模里, 盖上保鲜膜,进行 最后发酵约40分钟或双倍大。 


Pandan Wool Roll Bread with Grated coconut)
8" round baking tin

Ingredients :
Lukewarm milk 30ml
Instant yeast 3g
Concetrate pandan juice 30ml
Bread flour 300g
Sea salt 5g
Sugar 30g
Whole egg 1 or 55g
Whipping cream 50 ml
Coconut milk 60ml

Filling :
Grated coconut 100g
Gula Melaka/palm sugar 200g, chopped
Panda leaf 2
Some salt

Method :
1. Mix in the instant yeast into warm milk,set aside.

2. Pour the bread flour, sea salt and sugar into mixing bowal, stir evenly.

3. Pour in whipping cream, pandan juice, egg and the instant yeast milk (step 1), knead the mixture with medium speed until become smooth and pliable dough. Cover with cling wrap and rest for 60 minutes or until double the size.

4. In a small pot, stir - fry grated coconut and pandan leaves with low flame until a bit dry. Add in chopped palm sugar, stir evenly, season with some salt to your liking. Dish out and set aside.

5. Grease the 8" round baking tin and line the base with paper.

6. On the working desk, scatter some flour, divide the proofed dough into 5 equal portion.
Roll the small dough into ball, cover with cling wrap and rest for 10 minutes.

7. Take one small dough, flatten it, use rolling pin to roll it in into oval shape. Use scraper cut lines at half of the dough. Scoop i Tbsp grated coconut filling on the other half of the dough. Wrap both sides of the dough inward and roll it into wool roll shape.

8. Arrange the wool roll bun along the baking tin. Repeat same steps until finish all the small doughs. Cover with cling wrap and rest for final proofing about 40 minutes or until double the size.

9. Brush the surface with milk, bake with preheated oven at 190' C for 20 minutes or until golden brown color.


其实。。。。。
面包体松软,翠绿充满香兰味,
椰糖椰丝内馅,香甜美味,
整体来说,充满南洋风味,
好好吃!!!


@@@@@ Enjoy ! @@@@@


2021年7月7日星期三

蘑菇造型面包 Mushroom shape Buns


删一项“待做名单”。。。。。。。。
椰丝蘑菇🍄造型包》

喜欢烘焙,
自然欣赏别人的烘焙作品。
看到喜欢或有挑战性的食谱,
就会收藏起来,
希望有天把它成功做出来。


这个蘑菇造型面包,
在“待做名单”冬眠已久。

趁居家防疫,时间无限,
给“待做名单”删一项吧。

看着可爱的蘑菇,
小小成就感油然而生💪💪


蘑菇造型面包
共9粒

材料 :
高筋面粉    200克
黄糖              30克
     盐               3克
牛奶             130克
即溶酵母         3克
奶油               20克

表层奶糊:
底筋面粉       40克
牛奶               40克
炼奶               30克
少许可可粉

内馅 : 
鲜椰丝           100克
马六甲椰糖    200克,剁碎
香兰叶                 2叶
少许盐

做法  : 
1.  在一个小煲内,放入鲜椰丝和香兰叶,小火翻炒至微感,加入椰糖碎,翻炒均匀,调入适量的盐,铲起,置旁待用。

2. 将所有材料(除了奶油)放入搅拌盆,中速搅拌成顺滑的面团。加入奶油继续搅拌成富有弹性的面团。盖上保鲜膜,休面60分钟。

3. 去除面团,轻轻排气,切割成9 等份。滚圆,松弛15分钟。

4. 小面团擀平,裹入1茶匙耶斯内馅,捏紧收口,排放在烤盘上,二度发酵约40分钟。

5.  将表层奶糊的低筋面粉遇牛奶拌匀。加入炼奶拌成奶糊,装入挤花袋,待用。

6.  二发后,表层挤上适量的奶糊,撒上可可粉。 送入预热烤箱190°C 烤约20分钟或熟香即可。


二发后,表层挤上适量的奶糊,撒上可可粉。


Mushroom shape Buns
Yield 9 buns


Ingredients :
Bread flour 200g
Brown sugar 30g
Salt 3g
Milk 130g
Instant yeast 3g
Butter 20g

Milk batter topping :
Cake flour 40g
Milk 40g
Condense milk 30g
Some cocoa powder

Filling :
Grated coconut 100g
Gula Melaka/palm sugar 200g, chopped
Panda leaf 2
Some salt

Method :
1. In a small pot, stir - fry grated coconut and pandan leaves with low flame until a bit dry. Add in chopped palm sugar, stir evenly, season with some salt to your liking. Dish out and set aside.

2. Pour all the ingredients (except butter)into the mixing bowl. Knead the mixture until become smooth dough. Add in butter, continue knead it until the dough is pliable.   Cover it with cling wrap and rest for 1 hour.

3. Take out the dough, lightly tape it to remove the air. Divide the dough into 9 equal portion. Roll them into balls and rest for 15 minutes.

4. Use rolling pin to flat the dough, wrap in 1tsp filling and seal up. Arrange the bun on the baking tray for final proofing about 40 minutes.

5.  Milk batter : Mix the cake flour and milk well. Add in the condense milk, blend well to form milk batter. Transfer the milk batter into a pipping bag for later use.

6. After the final proofing, pipe the milk batter on top and sieve the cocoa powder on it. Bake with preheated oven at 190°C for 20 minutes or until aromatic.


这批可爱的蘑菇造型面包,
除了有着养眼的外貌,
其实内涵也很叫人惊喜哦!

面包体松软,焦香,
甜香的椰丝拌抄椰糖内馅,
两者互搭,超级美味,
吃了一个,会接一个。。。。


@@@@@ Enjoy ! @@@@@ 


2021年7月6日星期二

冬瓜盅 (Double Boiled Winter Melon and Seafood)


《邻家冬瓜成熟时。。。。。》

邻居的冬瓜唱丰收。
大方的递一大粒于我。

居家防疫唯一的好处就是时间多了。
于是,
不辞劳苦,
又是掏空,又是刻纹,变出个养眼的冬瓜盅。

然候,
豪迈的下烧肉片,瘦肉条,香菇,瑶柱,虾仁,红枣,枸杞。。。。。
炖好后,
瓜软,汤甜不在话下,
配料口感既丰富又美味😊😊

这是近来居家吃得最疗愈的一道了�

邻居的冬瓜唱丰收。
大方的递一大粒于我。


直接从瓜圃摘下的新鲜冬瓜......


冬瓜盅
供3人份

材料:
冬瓜 1粒
冬瓜肉 50克(切丁)
冬菇 5朵(洗净,浸軟,)
瑤柱 5粒(洗净,浸軟)
金华火腿 30g,(以烧肉取代)
瘦肉 20g
虾仁 10只
去籽红枣 3粒
高汤 300 毫升
适量的盐和胡椒粉

枸杞 1/2 茶匙

做法 :
1. 把冬瓜的顶部切去,再把中间瓜籽淘空,然后瓜身上端刻成锯齿形.
2. 将烧肉和瘦肉切幼条状.冬菇切丁.
3. 把所有材料(除了枸杞)倒入冬瓜盅,注入高汤,盖上冬瓜皮盖,隔水蒸40分钟.
4. 调入适量的盐和胡椒粉,加入枸杞,再蒸5分钟即可上桌享用.

小贴士:
高汤: 鸡骨或猪骨熬煮的汤. 或浸泡冬菇,瑶柱水.


把中间瓜籽淘空,然后瓜身上端刻成锯齿形.


把所有材料(除了枸杞)倒入冬瓜盅,注入高汤,隔水蒸40分钟.(没有盖上冬瓜上皮)
调入适量的盐和胡椒粉,加入枸杞,再蒸5分钟即可上桌享用.


Double Boiled Winter Melon and Seafood

For 3 pax

Ingredients:
Winter melon  1
Winter melon flesh  30g
Mushroom  5(cleaned and soaked)

Dried scallop  5(cleaned and soaked)
Jin Hua ham  30g, (replace with roasted pork)
Lean meat  20g
Prawn 10
Seedless red dates 3
Broth   300 ml
Some salt and pepepr

Wolfberry 1/2 tsp

Method  :
1.  Cut out the upper part of the winter melon. Empty the inner part of seeds . Use the knife to carve the edge of the winter melon into zig zag(saw) pattern.
2.  Cut the roasted pork meat and lean meat into strip. Diced the soaked mushroom.

3.  Put all the ingredients (except wolfberry) into the winter melon and pour in the broth, steam with the winter melon cover for 40 minutes.
4.  Season with some salt and peper to your liking and scatter the wolf berry, continue to steam for another 5 minutes, then is done !

Tips:
Broth : Cook with chicken bone or pork bone + water.   OR the soaking water from mushroom  and dried scallop. 


@@@@@ Enjoy! @@@@@


Related Posts Plugin for WordPress, Blogger...