2019年2月24日星期日

古早味巧克力奶油芝士蛋糕 (Taiwanese Chocolate Cream cheese Sponge Cake)


前一些日,一位远方的朋友,
托友人,送来一包浓郁巧克力香气的可可粉。
感恩哦!
感恩你在安迪销声匿迹的当儿,还记得我,
给我百里送温馨,
让我再次感到博客世界,温情满满,幸福满满。。。
感恩哦!

2019年2月23日星期六

古早味火龙果蛋糕 ( Taiwanese Dragon fruit sponge Cake)


前两个贴,分享过火龙果相思蛋糕
当时,第一次尝试用火龙果来做蛋糕,不敢下重量。

结果,成品出炉,
卖相不错,味道也不差。

2019年2月22日星期五

腐竹薏米白果糖水 (Beancurd Skin Ginkgo Nut Barley Tong sui/Dessert)


新年期间,朋友相聚,
其中一家,煮了这道家户喻晓的腐竹薏米白果糖水。
当时,在座的每一位朋友,包过安迪在内都嚷着说: 好吃!

2019年2月17日星期日

火龙果相思蛋糕 (Dragon fruit Ogura Cake)


想念相思蛋糕的“轻”和"柔"。。。。


想到尝试新口味,看到水果篮里有一个火龙果。
念头一来,就搅拌70克的浓缩无添水火龙果汁加入,
送入烤箱前的火龙果面糊,
粉红,粉红,一片春意荡漾。
想到还蛮应这新春佳节的。

可惜。。。一旦高温的化学之下,
迷人的粉红春意荡然无存;
所幸,卖相依然在被接纳的程度。


有机会,会再尝试,
在火龙果的面糊中,加几滴柠檬汁,
看看是否可以扭转乾坤,
还回粉嫩的色彩。


火龙果相思蛋糕
模具 : 7寸方形烤模

材料:

A
蛋黄 100克
全蛋 1 个
盐 1/4 茶匙
粟米油 60克
鲜奶 40克

不加水火龙果汁 70克
低筋面粉 75克

B
蛋白 200克
细砂糖 80克
柠檬汁   1 茶匙( 以1/4 茶匙塔塔粉取代)

做法 (A)
1。蛋黄、全蛋、盐、粟米油、鲜奶用打蛋器打至起小泡。
2。筛入低筋面粉再打滑,舀出1/2的面糊加入火龙果汁,搅拌均匀,放一边备用,另外1/2的原味面糊,也是置旁待用。

做法 (B)
1。蛋白加+柠檬汁+细砂糖打至起泡不跌


2。最后把2款做法(A)各别和蛋白霜混合至均匀。(像戚风蛋糕的混合法)


3。先将火龙果面糊倒入7寸的方模里,再倒入原味的面糊,然后把空气敲出。 放入预热后的烤箱里,于蒸烤法160'C烘烤60分钟或至熟便可。


4。蛋糕烘好后,立刻取出,倒扣待凉后才切开享用。


无加水浓缩火龙果汁
Concentrated dragon fruit juice


原味面糊和火龙果面糊
Original flavor batter and Dragon fruit batter 


先倒入火龙果面糊,再倒入原味面糊。
Pour  the dragon fruit batter in into the pan,
 followed by the original taste batter. 


Dragon fruit Ogura Cake
7" square baking pan


Ingredients:
A
egg york         100g
whole egg       1
salt                 1/4 tsp   
corn oil      60g 
fresh milk  40g 
Concentrated dragon fruit juice 70g
superfine flour 75g 

B

egg white      200g
castor sugar  80g
lemon juice   1 tsp(substituted by 1/4 tsp tatar powder)


Method :
A
1.  Beat the  egg yolk,whole egg,salt,corn oil and fresh milk  until fluffy.
2.  Sieve in superfine flour, then mix it until smooth and well combined. Scoop out 1/2 and mix well with concentrated dragon fruit juice. Put the dragon fruit batter and the other half original taste batter aside. 

B

1.  Beat egg white + lemon juice + castor sugar until stiff.

2.  Mix separately the 2 types of method A's mixture with egg white mixture. (apply chiffon cake mixing method).

3.  Pour  the dragon fruit batter in into the 7"pan, followed by the original taste batter. Then get rid of the air bubbles by lightly tapping the pan.

4. Put the baking pan into a larger pan half-filled with hot water. Bake in preheated oven at 160°C for 60 min or until baked.    
5.  Once baked, remove from the pan and immediately inverted on a rack to let it cool.


虽然这次的尝试,拿不到预期的粉红色彩,
但是蛋糕体是思念中的柔软,轻盈。。。

至于火龙果的味道,
坦白说,没有预期的浓厚,
或许分量不足,有机会再试试全谱都用火龙果吧。


@@@@@Enjoy ! @@@@@


2019年2月16日星期六

蓝莓牛油蛋糕(Blueberry Butter Cake)


恭喜发财!生意兴隆! 万事如意!
年十二,还是农历新年当中,
哈。。哈。。依然是迟来的祝福,
新年快乐!

原谅我的姗姗来迟,
皆因新年不是一般的忙,
加上电脑故障,无法正常上贴,
多多包涵。


这个蓝莓牛油蛋糕,其实在年三十就烤好了。
只是无暇加电脑故障,
才在今天与大家分享。
希望你会喜欢。


这次一共烤了2份。
第一份隔天,也就是年初一的早上,
与家人当早餐享用,当时有感蛋糕体稍微干了一些。

另一份,于锡纸裹封好,藏于温室数日。
年初三,外甥来拜年,开封让他品尝,
大家都觉得蛋糕体湿润,甜度适中,加上蓝莓的果酸和口感,
顿时赢得大家的赞赏,烤的人更开心:)

我想这就是传说中,回油后的牛油蛋糕了。


蓝莓牛油蛋糕
烤模 : 2个 (3 x 8)寸长方形
          或1个 (5 x 9)寸 长方形

材料:
有盐牛油    250克
细砂糖        200克
鸡蛋            4个(带壳约 257克)
香草精        1 1/2茶匙
低筋粉        250克
发粉           3/4茶匙
鲜蓝莓        150克

做法:
1。 预热烤箱170'c
2。 将牛油搅打至松发,加入细砂糖,继续搅打至顺滑。
3。 加入鸡蛋,徐徐拌匀后再逐粒加入鸡蛋,直到完成4个鸡蛋,加入香草精,搅拌均匀。
4。  徐徐的拌入低筋粉,拌匀。
5。  加入裹上一层低筋粉的蓝莓,拌匀。
6。  最候倒入烤模,送入预热烤箱170'c,烤约45分钟或插入竹签

温馨分享:
~ 牛油置放温室,手摸微硬即可搅打。
~  鲜蓝莓裹上一层底筋粉,蓝莓才不会聚沉在底部。


Blueberry Butter Cake
Baking tray : 2 (3' x 8') rectangle tray
                    or 1 (5 'x 9') rectangle tray

Ingredients :

 250g         Butter   
200g          Caster sugar        
4                Egg(with shell 257g)
1 1/2tsp     Vanilla essence   
250g          Cake flour       
3/4tsp        Baking powder          
150g          Fresh blueberry     

Method :
1.  Preheat oven to 170'C 

2.  Beat the butter till light and fluffy, add in sugar, continue beating until smooth and even.

3.  Add in 1 egg each time after well mixed until finished all the eggs. Add in vanilla essence and mix well.

4.  Slowly add in cake flour, mix well.

5.  Add in flour coated's blueberries, mix well.

6.  Lastly pour the batter into the appropriate baking tray, bake with preheated oven at 170'C, about 45 minutes or with the skewer tester come out from the cake is clean.


Tips sharing:
~ Place the butter at room temperature, when it is  still slightly hard, can start to beat it.
~ Coated the blueberry with a layer of cake flour is to prevent the berries sinking down to the bottom of the cake.


@@@@@ Enjoy! @@@@@@


2019年1月26日星期六

2019年饼 ~ 澳门杏仁酥饼 (Macau Almond Cookie


2019新年快乐!
呵。。。呵。。。安迪知道这一句新年快乐是有点迟了,
不过,常言道: 迟到好过没到嘛!


伦敦回来后,患上感冒,
整个人就是乏力无神,心想今年就不做年饼了。

可是看到脸书一片年饼洗版。
尤其是这款去年自己挑战失败的澳门杏仁酥饼,
看到网友美美呈现,顿时激发安迪的斗志,
向李姐虚心讨教,终于成功征服它,
不但让我搁置已久的部落格得以更新贴,
还启动我作年饼的引擎哦!


谢谢李姐的美好分享,
这款澳门杏仁酥饼,烘烤时已是满屋杏仁飘香。
烤后的酥饼,不但口感酥松,甜度适中,
满满的杏仁香气,齿颊留香,美味可口!
难怪李姐连续开炉五,六回呢!!


澳门杏仁酥饼
共做48 粒

食谱参阅 : Lee Chui Khoon(李姐)

材料:


材料 A ~ 条包装绿豆粉 150gm
                 普通面粉 100gm
                 发粉 1/4茶勺


材料 B ~ 杏仁粉 80gm
                 切片有皮杏仁粒70gm
                 糖粉 80gm
                 盐 1/4茶勺


材料 C ~  粟米油 90 - 95gm ( 認为太干,可以再加一点点)


食谱中的条包装绿豆粉。
但是包装的成份指示,是玉米粉哦;
或许坊间一直是如此叫的吧:)


 杏仁粉


切片有皮杏仁粒


做法 :
1 。过筛材料A。

2 。加入材料B拌匀。

3 。徐徐加入材料C的粟米油,拌至微成团即可。

 4 。取1份面团约12克,放入模具内,稍微按压平,用刮刀刮平,然后一一敲打出来。

 5。排例在铺着油纸的烘盘中,烘烤160度 20 - 25 分钟即可。


@@@@@ Enjoy ! @@@@@


2018年9月26日星期三

南瓜斯里木卡糕 (Pumpkin Seri Muka)


今天安迪有朋友到访。
故安迪蒸了好吃的斯里木卡糕来招待朋友。


有感上回的紫薯斯里木卡糕,美味十足。
所以用回同一个谱,只是换汤不换药,
把紫薯泥换上南瓜泥,液体量稍微更改,
成品出来,依然美味如惜,
获得朋友们的赞赏有加。


朋友的到来,倾谈间,互相学习,一起成长。
感觉良好,喜悦满满。

谢谢亲爱的姐姐们,
感恩有你们的经验分享,
让贫乏的我又充实了许多。。。。
感恩!


南瓜斯里木卡糕
 (7寸方形蒸盘)
食谱参考 :紫薯斯里木卡糕


下层材料 :
250克 糯米 (泡水1小时,沥干待用)
200毫升   淡椰浆
1/2 茶匙盐
1 汤匙  粟米油

上层材料 :
75克面粉
1 汤匙 粟米粉
120克  熟软南瓜(压碎成泥)
230毫升  浓缩椰浆
2 个蛋
100克 细砂糖
1/4 茶匙盐


做法 :
1。将底层材料混合均匀,倒入涂上油的蒸盘,大火蒸30分钟。从蒸锅取出,以压板压平实糯米。

2。 将(除了压碎南)所有上层材料搅拌均匀,过筛后,和南瓜泥拌匀。  将南瓜面糊以小火煮微滚。 最后倒在做法(1)的糯米层上,中火蒸30分钟或至熟。(蒸锅水一定要滚才放入面糊


Pumpkin Seri Muka
(7" square steaming tray)
Recipe adapted from : Purple Seri Muka 

BOTTOM LAYER: 
250g Glutinous Rice - soak 1 hour & drain 
200ml Thin Coconut Milk
1/2 tsp Salt
 1 tbsp corn Oil 


TOP LAYER: 

75g Flour
1 tbs Cornflour
120g Boiled pumpkin (mashed)
 

230ml Thick Coconut Milk 
2 Eggs
100g Sugar
1/4 tsp Salt


METHOD:  

1. Mix all bottom layer ingredients & place into greased steaming tray . Steam 30 minutes. Remove from steamer & press the glutinous rice down to even it.


2. Mix all top layer ingredients, except the mashed pumpkin , until smooth. Sieve & mix in Mashed pumpkin.  Cook in a pot at low flame until slightly boil. Pour onto bottom layer & steam 30 minutes with medium flame until cooked. (make sure water is pre-boiled) 


松软又充满椰奶香气的底层,
搭上甜香的南瓜上层,
依然扣人心眩,口口皆感动,
美味满分!


@@@@@ Enjoy ! @@@@@

2018年9月24日星期一

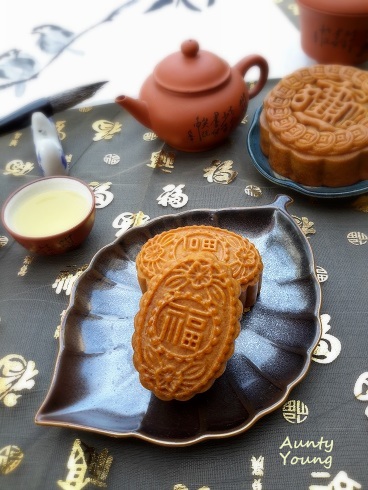
传统莲蓉月饼2018 (Traditional Lotus Seed Paste Mooncake)2018


农历八月十五,
有华人的地方,普天同庆,中秋节。


这几天,安迪的手机信息,脸书私讯,
陆陆续续,接到亲友的佳节祝福,
让人倍感温馨,幸福。

谢谢,亲爱的你们。
人生旅途当中,感恩有你们的出席。


再一次老土的说,
安迪就是一名传统的宗华妇女。

中秋如此大节的日子,
安家厨房,怎么可以少了月饼这一环节呢?
而且还一定要烤“传统莲容月饼”。
这是一种坚持,
也是维系传统的一分小小贡献。


椭圆福字的月饼模子,好讨喜。
个人喜欢无角代表圆容,福字带来喜悦满满。

也是买了数年的模子,
今年才随缘开装。


至于那个圆形”招财进宝“,已经在数年前出现国,
也是我喜欢的模子之一,
故今年再度让它亮相。

讲起来,最近或许你发觉,
安迪家的照片拍摄道具,开始有重复的现象。

因为机缘之下,接触了"极简主义"(Minimilism)
开始减少购买的冲动,分段式的极简家里多余的物件。
慢慢的学着“断舍离”
生活简单,充实,喜悦。。。

本着好东西,应该分享。
所谓: 独乐乐,不如众乐乐嘛!


什么是极简生活?

极简生活不是不买车, 极简生活也不是不化妆。极简生活不是家里只能有100件物品。
极简生活是有意识地将生活中的物质和非物质最大程度的简化,从而提高精神的自由。

这种“不以物喜”的生活主张知道自己的需要,并致力于将自己的精力、财力、时间等资源集中于人生中最重要的事情上。


传统莲蓉馅月饼
食谱参考 :传统莲蓉馅月饼 2017

材料:                             
A(月饼皮)                                     
250克 普通面粉                               
175克 糖浆                                       
50克 花生油                                   
1茶匙 枧水   
                   
B (莲蓉馅)                                     
900克莲蓉                                  
  60克 烤香瓜子

做法:
1。  月饼皮: 将所有材料A 混合拌匀。置旁休面 45 分钟。将面团分割成需要的分量。搓圆待用。
2。  馅料: 将烤香瓜子与莲蓉混合成馅,分成需要的量,搓圆待用。
3。  将饼皮团杆扁包入馅料,搓圆后压入月饼模形里,扣出排在烤盘上。
4。  放入预热烤箱,以 180°
C 烘烤10分钟,然后取出,放置一旁待冷,约10至15 分钟。最后涂上一层蛋黄,再放入烤箱继续烘烤10至15分钟至金黄色即可。   

小记录: 
圆形“招财进宝”月饼每粒重150克  : 皮重50克;内馅重100克
椭圆形“福” 月饼每粒重50克  : 皮重20克;内馅重30克


Traditional Lotus Seed Paste Mooncake 
Recipe adapted from :  
Ingredients:Traditional Lotus Seed Paste Mooncake 2017

A ( mooncake Pastry)
250g plain flour
175g golden syrup
50g peanut oil
1tsp alkaline water

B (Filling)
900g lotus seed paste
60g roasted melon seed


Method
1.   Mooncake Pastry : Mix ingredients A till well combined.  set aside for 45 minutes.  Divide into disired portions. 
Roll into balls.

2.   Filling : Mix the lotus seed paste and roasted melon seed well.  Devide lotus seed paste into desired portions.  Roll into balls.

3.   Wrap filling with mooncake pastry. Roll into balls.  Press into mooncake mould, Tap lightly to de-mould.

4.   Bake in a preheated oven at 180°C for 10 minutes.  Remove and leave to cool, for about 10 to 15 minutes.  Brush the top with beaten egg yolk.  Bake in oven again for 10 to 15 minutes till golden brown. 


Note: 

~Weight of the round shape mooncake :150g  : Pastry :50g;Filling :100g
~Weight of the oval shape mooncake : 50g  : Pastry :20g;Filling :30g


最后,
在今天这个月圆的美好日子,
送上我真诚的祝福。

愿:
大家,人圆,事满,
极简,充实,喜悦。
中秋节快乐!

@@@@@ Enjoy! @@@@@


Related Posts Plugin for WordPress, Blogger...