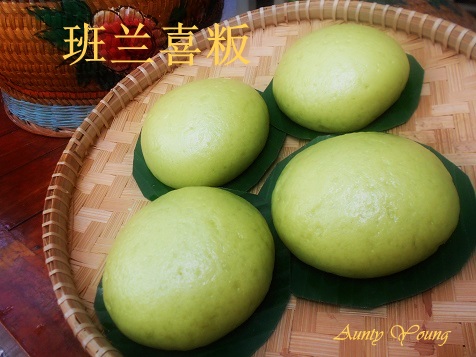
显示标签为“Pandan Leaves(班兰/香兰叶)”的博文。显示所有博文

2017年6月14日星期三

Pandan Kopitiam Milk Buns (香兰咖啡店面包)


在安家既叫好又叫座,
15粒的面包,一天里面被消灭到无影无踪,
然后马上又下订单,
哦埋葛!!!

2015年8月12日星期三

迷你班兰蛋挞(Mini Pandan Egg Tarts)


最近,几轮的凉风密雨,我家的班兰叶如雨后春笋,茂密横生。
看着就不能耐,随即修斩了数丛,搅拌成汁,好做糕点。
今天就随缘先来个迷你班兰蛋挞好了。


还是用回黑妈妈的挞皮,只是为了搭上小拇指的列车,
把白糖换成了黄糖,还是一样的香酥可口。


蛋挞
约做40个

内馅材料:
白糖  60克
浓缩班兰液70克
生奶(罐头)125克
鸡蛋 2粒

蛋挞皮材料:
面粉200克
蛋黄粉11克
奶粉11克
黄糖 14克
鸡蛋 1个
奶油 140克

做法:

1。内馅 :将班兰液小火煮溶黄糖,置旁 待冷。把鸡蛋打匀, (不用打到发),然后加入生奶和凉班兰糖水拌匀,过筛即可。

2。挞皮:用手把所有挞皮材料搓匀成团,将团分成40份(每份约12克),取一份铺在迷你蛋挞模型里慢慢按, 要按到薄薄一层,完成40个模子备用。
3。 将做法(1)的内馅倒入铺好挞皮的模子中(约9分满,因为烤好后会下沉一些),放入预热烤箱175度(温度视个人烤箱而定),烤约20-25 分钟。

小小分享 : 
因为之前做烘焙,有剩余的三香叶(斑斓,香茅,疯柑)煮水,我一并用来搅拌班兰汁,个人觉得,有影响到班兰内馅。不但没有苦涩之味,还有股芳香的美味。

Egg Tarts
yield 40pcs

Filling :
Sugar  60g
Concentrate pandan juice 70g
Can evaporated milk 125g
Egg 2
Pastry :
Flour 200g
Custard powder 11g
Milk powder1 1g
Brown sugar 14g
Egg 1
Butter 140g

Method :

1。Filling :Melt the sugar with pandan juice at low flame, set aside. Lightly beat the egg, then add in the evaporated milk and cooled pandan syrup, stir well and sieve.

2。Pastry:Knead all the pastry ingredients to form a dough. Divide the dough into 40 portions(about 12g each), then take 1 portion and slowly press it into the mould to form the crust. Do the same for all 20 moulds.
3。Pour the filling (step 1) into the mould with dough until 90 % full (it will subside after baked). Bake in a preheated oven at 175°C for about 20 -25 minutes (temperature may be changed to suit individual's oven)

Tips :
I used 3 type fragrant leaves( pandan, kaffir lime,lemon grass) water to blend the pandan juice.  It helps to eliminate the bitterness of the pandan egg filling and the egg tart is more aromatic.


班兰蛋液的内馅,很香!很香!
或许因为我用了三款(班兰,疯柑,香茅)香叶煮水,来搅拌班兰汁的关系吧,
下一张贴子就会分享这三香叶水用来做啥料理,
或许聪明的你已经猜到了,下张贴,自有分晓咯,哈。。。。


***** Enjoy !*****


This post is linked to the event Little Thumbs Up (August 2015 : Brown Sugar and Molasses)
organised by Zoe of Bake for Happy Kids and Doreen of My Little Favourite DIY,
and hosted by Jess from Bakericious.


This post is linked to the Best Recipes for Everyone August 2015 Event (Theme: Dim Sum) organised by Fion XuanHom's Mum Kitchen Diary) and hosted by May (厨苑食谱).

2015年6月4日星期四

烫面斑兰戚风蛋糕(Cooked Dough Pandan Chiffon Cake)


 烫面戚风对我来说是新尝试。
之前一直觉得它有难度,失败率高,
所以都只能观赏,不宜尝试。


这次托Fion的福,我应约而做出了第一个烫面戚风。
原来,没有预期的复杂艰难。
蛋糕体却超。。。。。。超松软的!


烫面斑兰戚风蛋糕
食谱取自:仙子
(20cm心形戚风模子)

材料:
蛋黄面糊
蛋黄 5个
椰奶 70克
无盐奶油 50克
浓香兰叶汁 40克
盐 1/8茶匙
低筋面粉 90克

蛋白霜
蛋白 5个
柠檬汁 半茶匙
细砂糖 80克

做法:
1)把椰奶,奶油,香兰汁加热至奶油溶化。
2)趁热将低筋面粉筛入并搅拌均匀。
3)将盐加入蛋黄里搅拌,再把做法(2)慢慢倒入蛋黄里拌匀。
4)蛋白打至湿性发泡,然后分次加入蛋黄面糊里搅拌均匀。
5)放入预热烤箱,以165度,烤约50分钟。
6)烘烤后,立刻取出倒扣,待完全凉后才脱模享用。

** 這個蛋糕最重要的訣竅就是,從製作蛋黃麵糊一直到加入蛋白霜,溫度都還是溫溫的。所以動作要快哦!**


Cooked Dough Pandan Chiffon Cake
Recipe adapted from:仙子
 (20cm heart shape chiffon cake mould)

Ingredients:
(A)
5 egg yolk
70 coconut milk
50 unsalted butter
40g concentrate pandan juice
1/8 tsp salt
90g cake flour

(B)
5 egg whites
80g caster sugar
1/4 tsp lemon juice


Method :
1) Heat the coconut milk, butter and pandan juice together until the butter melts.
2) While the mixture is still hot, stir in the cake flour and mix evenly.
3) Beat the egg yolk with salt, then slowly pour (2) into the egg yolk mixture and mix evenly.
4) Beat the egg whites until soft peaks form, then gently fold it into (3).
5) Pour the batter into the chiffon cake mould, then bake in a preheated oven at 165°C for 50 minutes.
6) Immediately after removing from the oven, invert the cake and mould and only remove the cake after it has cooled down completely.

** The main trick to success for this recipe is to maintain a warm temperature, throughout the whole process of mixing the batter, so you have to be quick about it!**


烫面戚风是一款高水分,高蛋量的戚风。
由于它的粉量少;而 水分、油脂的含量则多;
如果用普通戚风的方法来做,一定是一塌糊涂。


因为过稀的蛋黄糊与蛋白糊混合的时后蛋白一定会消泡 ;
做过戚风的朋友,都知道一旦蛋白消泡,
整个戚风就莎哟娜啦了!
(蛋糕体扎实又矮小)


所谓“烫面”,就是面粉里的淀粉和蛋白质,
在高温下变性后,产生很好的增稠力。
所以就算水分再高,有了足够的稠度,
我们一样可以做出的漂亮的戚风。
甚至蛋糕组织比普通式还要来得松软细腻。


I'm joining Best Recipes for Everyone ~ BREE#10
June 2015 Event: Secret of Chiffon & Roll Cake
Organized & hosted by Fion of Xuan Hom's Mom Kitchen Diary

2014年11月14日星期五

巧克力班兰椰奶魔术卡士达蛋糕 (Chocolate Pandan Magic Custard Cake)


今天胆粗粗,玩盏卜(campur),
巧克力加班兰,然后混合成糊。
1模子拌匀面糊,2种色味,3层口感,
 魔术升级!
Hehe, I was feeling bold today, so I decided to have fun with campur(mixing); chocolate + pandan. 1 batter, 2 flavors, 3 textures, magic skills upgrade! 

2014年9月12日星期五

班兰魔术卡士达蛋糕(Pandan Magic Custard Cake)

再度挥起魔术棒!
哄嘛哩哄。。。。。。。变!
Once again, I whipped out my magic wand. 
Abracadabra。。。。。


 噔。。。噔。。噔。。。。噔。。。。。
看!不同层绿的班兰魔术卡士达蛋糕。
 Ta-da! A tri-color Pandan Magic Custard Cake!

2013年9月5日星期四

班兰喜粄(Pandan Hee Ban)

客家人叫这糕  - 喜粄。 
 原味喜粄的口感软中带Q,  有着一股淡淡的米香味。
加了班兰汁的喜粄,
除了多了班兰的甜香,也在外貌上添加自然的翠绿


一道简单操作,但是又美味可口的包点。


吃惯清淡口味的你,肯定对它爱不释口,
一个接一个,啃个不停,一点也不奇怪。


至于重口味的,涂上咖椰(kaya)或果酱,
配上它那弹牙的口感,相信还是会获得你的青睐的。


班兰喜粄
 食谱参考 :   小雨伞

材料
普通面粉 150g (过筛)
糯米粉 130g(过筛)
细砂糖   70g                                                                           
即溶酵母3g (适量水溶化)                                                      
班兰汁200g (大约10片班兰叶加200g水,搅拌成汁)
植物油 15g
香蕉叶 适量
  1. 酵母溶于清水内,拌均。干净的香蕉叶用热水烫软,剪成适合大小的块状。
  2. 面粉,糯米粉,细砂糖,和酵母水,班兰汁混合均匀搓成团(班兰汁慢慢加入)。
  3. 分次加入油,再搓揉均匀(如果会粘手的话,用朔料刮刀代替)
  4. 手掌抹上油,把面团直接分成50g的小团,搓圆。
  5. 把圆团放在香蕉叶上,用掌心轻压按扁,发酵25-30分钟。
  6. 发酵好的喜粄,用手轻轻按一按,表面有弹性,就可以煮开蒸锅里的水,水滚后放入喜粄,中火蒸12分钟,马上熄火(不要马上取出锅里的喜粄)
  7. 锅盖打开小缝保持5分钟,才小心打开锅盖,取出喜粄待冷,别让水分滴到喜粄,喜粄就会美美了。


The Hakka people call this steam bun as "Hee Ban"


The difference between normal steam bun and hee ban ,
is the chewy texture contributed by the glutenous rice flour.


Pandan Hee Ban

Ingredients:  (12 pieces):
130g glutinous rice flour
150g plain flour 
70g fine sugar
15g corn oil
3g yeast (mix with some water)
200g pandan juice (12pandan leaves + 200g water,blend into pandan juice)

Banana leaves (cut into round shapes)
Method:

1.  In a big bowl add in yeast water  glutinous rice flour, flour and sugar. Then, slowly pour in pandan juice and knead until soft and smooth. Slowly mix in the oil and knead until smooth.
3. Divide dough into small portion (about 50g), shape into small round ball and flatten the dough slightly by pressing with your palm. 
4. Place the dough on greased banana leaf.
5. Rest and proof for 25 -30 min or double in size.
6. Steam over medium high heat for 12mins. Turn the heat off. Open the steamer lid slightly to allow the heat to release slowly. Remove the buns from the steamer after 5 minutes.


Original Hee Ban's texture is soft and chewy. 
The sweetness is mild and full of rice aroma.


However,when pandan juice is added in  ,
the Hee Ban will produce a mild  pandan taste,
and present a more natural light green colour. 


I am submitting this post to Little Thumbs Up September - Pandan hosted by Joceline @ Butter, Flour & Me, organized by Zoe@ Bake For Happy Kids and Mui Mui @ My Little Favourites DIY. 


@@@@@@@ Enjoy @@@@@@@

2013年6月27日星期四

印尼香兰印尼千层蛋糕(Kuih Lapis Pandan/Pandan Indonesia Layer Cake)

之前看到许多好姐妹分享漂亮的千层蛋糕,
蠢蠢欲动,但是很快的又有许多借口叫人止步。
什么蛋黄太多,不健康啦;
我的老爷烤炉没有上下火设备啦;
连最近万人厌的烟霾,也可以成为理由。
哈,哈,哈,人啊,懒起来真是借口多多。


昨天,又与千层蛋糕对上,是鲸鱼老师家的。
乖乖,不得了,身上的懒虫终于被轰了出去;
加上拨了一通长途电话,向甜姐儿借胆去。
这下可好了,懒虫不见了,胆又生毛了,
有"胆"无谋, 冲啊。。。。!敲蛋啦。。! 


这就是有勇无谋的成绩,
哈。。。。。这是意料中的事。


 看,还有上半身跟下半身的配搭,
都怪我跟烤炉的沟通不好,
它闹起别扭,我只好让我的千层穿上两件式的衣服咯,@.@


幸好食谱配搭的好,这千层超香超好吃!


印尼香兰千层蛋糕(Kuih Lapis Pandan)


材料:7寸正方模(1个)


食谱取自:Helena‘s Kitchen
同时参考: Joceline lyn  ,鲸鱼蓝蓝小窝居
(A)
牛油 200克,奶油芝士(Cream Cheese) 150克,
细纱糖 80克,甜炼奶 5汤匙,蛋黄 14个

(B)
香港粉(我用低筋面粉 180克,发粉 1茶匙

(C)
细纱糖 130克,蛋白 7个,白醋-数滴

(D)
香兰精华 1茶匙,青色素 2滴,香草精 1茶匙


做法:

1)牛油,奶油芝士,糖和炼奶打至变奶白色(大约10分钟)。
2)  分次加入蛋黄,拌打至均匀。搁置备用。
3)  在另一干净盆中把蛋白,糖和白醋以高速拌打至发或硬性发泡,大约5-7分钟。
4)  把粉类过筛,拌入做法(2)里。
5)  再把(4)拌入打发的蛋白霜内,拌均。
6)  把面糊分成两份,一份加入香草精。
7)  另一份加入香兰精华和青色素,搅拌均匀。
8)  烤炉预热,7寸方,盘底部刷上牛油,铺上蛋糕纸,放70克的原味(Vanilla)面糊,上火200度,烤大约6-7分钟。
9)  然后拿出,稍微用压板轻轻压蛋糕的表面,这样继续做,一层Vanilla,一层香兰味(Pandan),相同步骤烤完为止。
10) 最后一层用上火烘5分钟然后上下火烤5分钟至上色。 出炉后放凉,切片。


Utensils: 7 inch square cake mould


Recipe adapted from Helena‘s Kitchen
With reference to Joceline lyn鲸鱼蓝蓝小窝居

(A)
200g butter, 150g cream cheese, 
80g caster sugar, 5tbsp condensed milk, 14 egg yolks

(B)
180g cake flour, 1tsp baking powder

(C)
130g caster sugar, 7 egg whites, a few drops of vinegar

(D)
1tsp pandan essence, 2 drops of greeb colouring, 1tsp vanilla essence


Method:

1) Beat the butter, cream cheese, caster sugar and condensed milk until a milky white colour (about 10 mins).
2) Add in the egg yolks one at a time, mixing well after each addition.
3) In another clean bowl, beat the sugar egg whites and vinegar at high speed for about 5-7 minutes until hard peaks form.
4) Sieve the powders into the batter from step 2 and mix well.
5) Fold the batter from step 4 into the meringue from step 3.
6) Divide the battet into two. Add the vanilla essence to one portion, and the pandan essence and green colouring to the other portion. Mix evenly.
7) Preheat the oven to 200°C. Brush the bottom of the 7 inch cake mould with a thin layer of melted butter and line it with baking paper. Pour in 70g of vanilla batter and proceed to bake it using top heat for 6-7 minutes.
8) Use a flat based tool to press lightly on the baked layer, then pour in 70g of pandan batter and bake. Alternate between the vanilla and pandan batter until the batter is finished.
9) For the final layer, bake using top heat for 5 minutes, then bottom heat for another 5 minutes. Allow it to cool after removing from the oven before cutting into slices.


 不管怎么说,还是衷心的谢谢鲸鱼老师的带动。
谢谢甜姐儿(Joceline lyn)  借胆给安迪。
(安迪的胆,早在十六年前已经被医生拿走了)。


差点忘了谢谢靓靓- Li  Shuan的美好食谱。
谢谢你,无私的分享。


***************************************
Related Posts Plugin for WordPress, Blogger...