2015年11月14日星期六

香烤培根番茄饭 (Pan-fry Bacon Tomato Rice)


 去年差不多这个月份,
网路流行煮这道好吃到六亲不认的番茄饭。
哈。。。。。哈。。。。。。听起来很夸张!
但是当时确实风靡一时,到处都听闻它的分享。

我虽然贪玩,不过偶尔也会对一些事较慢热的。
比如我就慢了很久才做日式炼奶面包,魔术卡士达蛋糕,
今天这个番茄饭也迟了整一年多!

要不是答应了“姥姥”家庭的老幺(小燕子),
今天或许都还没煮上这道“六亲不认”呢!!!


 那天采购,碰上Jxxx Gxxxxx樱桃番茄大促销,买一盒送一盒。
当然快快发挥安迪精明消费的本色,lap两套回来,
即可当零食,又可兑现承诺,
烹煮番茄饭交差去,何乐而不为呢?

单单番茄饭,略显单调。
打开冰箱,就地取材,
一眼望去,绿悠悠的芥兰花最抢眼,
再来几片培根香烤,应该会色,香。味具备。
就这样,即兴的煮,欢喜的期待。


 上面的图,稀少的培根是为了拍照不抢番茄饭的镜,
这张加了多多的培根,才是真正享用的好料。


其实不重口味的,少许的培根片是点缀。
这样反而可以吃到番茄隐隐约约的香甜,我倒喜欢。
虽然还不至于好吃到六亲不认,
哈。。。。哈。。。。。


香烤培根番茄反
共做2小煲于2人用
(器皿: 2个700毫升Corning ware)

材料 :
白米      200克
清水      220克
樱桃番茄   10粒, 中间切割十字
橄榄油   1茶匙
盐          适量
麝香草  适量


佐料:
烤香培根     50克
川烫芥兰花   40克 
莫扎里拉乳酪 40克(随喜)
少许橄榄圈


做法 :  

1。把米淘洗后,放入一个陶瓷或钢小煲,注入清水,排入樱桃番茄,加入橄榄油,盐和麝香草,盖上盖子。


2。蒸锅水滚,放入做法(1)的番茄饭煲,中火蒸煮15- 20分钟。

3。当饭在蒸煮时,将芥兰花洗净切粒状,以一个小煲,水滚川烫1分钟或软(不好过久以免变
黄),置旁待用。

4。以不粘锅,小火烤香培根片,剪成小片待用。

5。饭熟后,用饭勺把番茄果肉和米饭搅拌均匀,再搭上川烫芥兰花,烤香培根片和莫扎里拉乳酪,乘热享用。

备注 :
以上材料除二,然后用两个700毫升的小煲煮出。 你可以随喜换上比较大的器皿,就一份量煮完。


小小分享,图中用来煮这番茄饭的700mlCorning ware是当年旅游Pulau Langkawi 时所买的。
由于他是个免税小岛,所以买这些进口高质器皿是很划算哦。
最少都比一般超市便宜一倍。


Pan-fry Bacon tomato Rice
Yield 2 pots
(Utensil :2 x 700ml Corning ware)

Ingredients:
Rice     200g
Water   220g
Cherry tomato   10g (Make a cross cut in the middle)
Olive oil  1tsp
Some salt
Some  thyme whole

Condiments  ;
Pan-fry bacon slices    50g
Blanched broccoli        40g
Mozzarella cheese        40g(Optional)
Some olive rings

Method :
1.  Clean the rice and put into a small ceramic or stainless steal pot, pour in the water. arrange the cherry tomato on the top of the rice. Add in olive oil,salt and thyme whole. Cover with the lid.

2.  Place the tomato rice pot into the boiling water steamer, steam with medium flame for 15- 20 minutes.

3.  While the rice is cooking,  clean and cut the broccoli into floret.  Blanch with boiling water in a small pot about 1 minute or until tender( too long time might cause it turn yellowish), set aside.  

4.  Pan-fry the bacon slices with non-stick pan at low flame.  Cut into small pieces.

5.  When the rice is cooked, use the ladle to mix over the rice and the tomato. Serve with blanched broccoli, pan-fry bacon pieces and mozzarella cheese while hot.

Tips:
You can divide the above ingredients into half, then cook them using two 700ml containers. If you want to cook everything at once, then combine all of them in one big pot to cook.


想着只给那两父女煮,就直接用两个小煲好了。
煮好,一人一煲,不用再洗碗。
(都怪懒虫在误导我,你们就跳过吧!)


都说那两父女是乳酪控,
自己会添加Chedar和Mozzalerra乳酪,
我。。。。。偶尔只眼看,只眼闭,
免得被指不识趣,扫兴:(


无可否认,加了乳酪,
让这单调的番茄饭不止添香气,
口感丰富又顺滑多了,
好吃! 

@@@@@ Enjoy ! @@@@@

2015年11月13日星期五

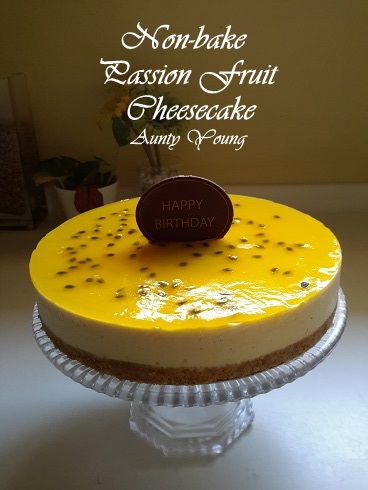
免烤百香果乳酪蛋糕 (Non-bake Passion Fruit Cheesecake)


前几天(9/11)是契女,Mel的生日。
因为今年巧遇SPM考试,为了不耽误她做最后冲刺,
契妈我只能暂时送上亲自做的生日蛋糕,
一来祝她生日快乐!而来愿她考试顺利!

我们已经约好,下个月的9号,
也就是生日的一个月后,好好的补庆一番。


免烤百香果乳酪蛋糕
(7寸圆形脱底模/6寸方形脱底模)

饼干底 :
苏打饼干片 – 80g
烤香核桃 - 20g
牛油 – 50g

乳酪蛋糕体 :
软化奶油乳酪 – 270g
细砂糖 – 55g
百香果 – 3颗(只取果汁)
动物性鲜奶油– 100g
吉利丁片 –10g

上层材料 :
百香果 -1颗
芒果汁或水(芒果汁或水加上百香果共90毫升)
吉利丁片- 2g


饼底做法 :
1。 将苏打饼干和烤核桃放入塑胶袋,以擀面棍压碎
2。 牛油隔水溶化,然后加入以上的饼干碎,拌均匀
3。 倒入已包上铝箔纸的底部,用汤匙压平,冷藏于冰箱约30分钟。

乳酪蛋糕体做法 :
1。 吉利丁片泡冰水软化,备用
2。 将奶油乳酪和细砂糖隔热水拌至无颗粒状,加入百香果汁拌均匀。
3。 将动物性鲜奶油倒入一个外围冰块的钢盆中,打发。
4。 把打发的动物性鲜奶油加入乳酪糊里,拌均匀。
5。 将泡软吉利丁片挤干水分放入以上乳酪糊,搅拌至溶解。
6。 最后将乳酪糊倒入饼底上,盖上保鲜膜,冷藏于冰箱冷藏3个小时或表面凝固。


上层做法:
1。 芒果汁加百香果肉共90毫升与2克的泡软吉利丁片,个热水煮至吉利丁片溶解。
2。 取出乳酪蛋糕,淋上百香果果冻,普盖上保鲜纸,再度冷藏于冰箱约6小时或隔夜。


 Non-bake Passion Fruit Cheese cake
(7 inch round tin with removable base/ 6 inch square tin with removable base)

Biscuit base:
80g digestive biscuits
20g toasted walnut
50g butter

Cream cheese mixture :
270g softened cream cheese
55g castor sugar
3 passion fruit (only extract the juice)
100g whipping cream
9g gelatin leaf

Topping ingredients :
1 passion fruit
mango juice or water ( plus passion fruit to get a total 100ml)
2 g gelatine leave (soak into cool water to soften it)


Method for biscuit base:
1. Pour in the digestive biscuits and toasted walnut in a plastic bag and crush them with a rolling pin.

2. Double-boil the butter to melt it , then mix it evenly with the biscuit crumbs from (1).

3. Pour the crumbs mixture into the aluminum foil-lined round tin, flatten them evenly into a base, then chill in the fridge for about 30 minutes.


Method for cheesecake:
1. Immerse the gelatin leaf into ice water and set aside for later use.

2. Double boil the cream cheese + caster sugar and stir until the sugar has completely dissolved. Pour in the passion fruit juice, stir well.

3. Whip the whipping cream in a stainless steel bowl surrounded by ice cubes, until soft peaks form.

4.  Pour in the whipped whipping cream into the cream cheese mixture(step 2), mix well.

5. Drain the gelatin leaf of excess water and mix it into the cheese mixture(step 4). Mix evenly.

6. Pour the cheese mixture into the tin and chill in the fridge for 3 hours or until the surface solidifies.


Method for topping:
1.  Measure a total of 90 ml mango juice /water + passion fruit. Mix them with 2g of softened gelatin leaves in a double boil pot, until the gelatin leave have fully melted.

2.  Remove the cheese cake from the fridge, pour the passion fruit jelly on it, cover with wrapping paper and chill for about 6 hours or overnight.


这次同样的食谱,我做了2个蛋糕。
一个是7寸圆形,送给契女;
另外一个是6寸方形,给那两父女。
因为他们可是乳酪蛋糕控,
怎么可以没份吃呢?


@@@@@ Enjoy ! @@@@@

2015年11月11日星期三

核桃奇异果隔夜燕麦 ( No- Cook Overnight Oats with Kiwi Walnut)


一年前在Ann家看到这隔夜燕麦,就有好奇它的美味,
当时就快快藏好食谱,心也想试试,
可是后来就被一堆的圣诞食谱给迷忘了。


事隔一年,终于付诸行动开始了安家第一杯隔夜燕麦。
这得谢谢我的一斑“姥姥”好姐妹。


是她们对隔夜燕麦的疯狂热爱,感动了我,
把我那沉睡已久的欲念,再度唤醒!
然后也半兴奋半清仓的心态,跟着大队,
完成了图中这杯美味可口的核桃奇异果隔夜燕麦 。


缺乏经验的第一次,
子过小,容不下所有的配料果干,
最后拍了照片之后,还得倒进另一个碗里,才能优雅的享用。
哈。。。。哈。。。。让你们见笑了。


 淋上适量的蜂蜜,
开启了活力的一餐咯!


核桃奇异果 隔夜燕麦
食谱参考 : Anncoo Journal

材料:
6汤匙 有机燕麦
1/2杯 牛奶
1/2杯 优格/酸奶
1汤匙 亚麻籽

奇异果,樱桃番茄和杏桃干适量,切丁
2 汤匙    烤香核桃

1/2茶匙 香草香精
蜜糖,适量

做法:

1。用一个干净的玻璃瓶,放入燕麦片,亚麻籽和优格。


2。之后慢慢加入牛奶值到近3/4满,倒入1/2茶匙的香草香精然后用干净的勺子轻轻搅拌把瓶底下的燕麦和牛奶拌匀


3。最后加入准备好的水果,再搅两三次,盖上盖后放进冰箱冷藏隔夜。


4。隔天当你要享用时就以随意添加一些蜂蜜,搅拌后就能享用一份健康又营养的早餐了。


No- Cook Overnight Oats with Kiwi Walnut
Recipe adapted from : Anncoo Journal

Ingredients: 
6 tbsp Organic Rolled Oats
1/2 cup Fresh Milk
1/2 cup Plain or Greek Yoghurt
1 tbsp Flax seeds
some kiwi fruits, Chery tomato and dried apricot(diced),
2 tbsp toasted walnut
1/2 tsp Vanilla extract
some honey


Method:
1.  Using a clean sterilized glass jar, add rolled oats, flax seeds and yoghurt.


2.  Pour in milk, drop in 1/2 teaspoon of vanilla extract and gently stir the mixture with a clean spoon to loosen the oats at the bottom of the jar. Add a little more milk if the mixture is too thick.


3.  Lastly add in the fruits and walnut, give a few stirs. Cover the jar and leave the mixture overnight in the fridge.


4.  In the morning, before having your oats, drizzle some honey to sweeten the taste.


根据原食谱,所有材料都同时浸泡隔夜。
我喜欢干果嚼劲的口感,所以只浸泡燕麦,亚麻籽,牛奶和优格,
水果和坚果都保留在隔天早上欲享用时,再参进去。

第一次尝试,也没有太多的想法。
就家里有啥就放啥,
如大家所知,近年秒了嘛,
也是时候大清仓了。


之前也有听闻,有些朋友不能接受隔夜燕麦的味道和口感,
未尝先吐,让我有丝犹豫呢!
幸好自己还蛮喜欢这样原汁原味的健康早餐。
最后谢谢Ann的美好分享。


烤香核桃,杏桃干,奇异果和樱桃番茄。


@@@@@ ENJOY @@@@@ 


芒果莓子隔夜燕麦

材料:
6汤匙(45克)有机燕麦片(organic rolled oats)
1/2杯牛奶
1/2杯优格/酸奶
1汤匙奇异籽 (chia seeds)
3颗草莓,切四分
5颗黑莓
1/2个芒果,切丁
1/2茶匙香草精, 随意
少许烤过的杏仁

做法:
1.用一个干净(烧水烫过并擦干)的玻璃瓶,放入燕麦片,奇异籽和优格。

2.之后慢慢加入牛奶直到近3/4满,再倒入1/2茶匙的香草精然后用干净的勺子轻轻搅拌把瓶底下的燕麦片和牛奶拌均已。

3.最后加入准备好的水果,再搅拌两三次,盖上盖子然后放进冰箱冷藏一夜。

4.隔天当你要享用时就以随意添加一些喜爱的果仁和蜂蜜调味,搅拌后就能享受一份健康又有营养的早餐了。 - See more at: http://www.ellenaguan.com/2014/05/4-recipes-overnight-oats-part-ii.html#sthash.czqUiHcP.dpuf
芒果莓子隔夜燕麦

材料:
6汤匙(45克)有机燕麦片(organic rolled oats)
1/2杯牛奶
1/2杯优格/酸奶
1汤匙奇异籽 (chia seeds)
3颗草莓,切四分
5颗黑莓
1/2个芒果,切丁
1/2茶匙香草精, 随意
少许烤过的杏仁

做法:
1.用一个干净(烧水烫过并擦干)的玻璃瓶,放入燕麦片,奇异籽和优格。

2.之后慢慢加入牛奶直到近3/4满,再倒入1/2茶匙的香草精然后用干净的勺子轻轻搅拌把瓶底下的燕麦片和牛奶拌均已。

3.最后加入准备好的水果,再搅拌两三次,盖上盖子然后放进冰箱冷藏一夜。

4.隔天当你要享用时就以随意添加一些喜爱的果仁和蜂蜜调味,搅拌后就能享受一份健康又有营养的早餐了。 - See more at: http://www.ellenaguan.com/2014/05/4-recipes-overnight-oats-part-ii.html#sthash.czqUiHcP.dpuf
(Yield: 500ml Jar | Preparation: 5 minutes | Standing Time: Overnight)

Ingredients:
  • 6 Tablespoons (45g) of Organic Rolled Oats
  • 1/2 Cup Fresh Milk (can be slightly more)
  • 1/2 Cup Plain or Greek Yoghurt
  • 1 Tablespoon Chia Seeds
  • Some Strawberries, halved
  • Some Black Berries
  • 1/2 Portion of Mango, cubed
  • 1/2 Teaspoon Vanilla Extract, optional
  • Some Roasted Almond

Method:
1. Using a clean sterilized glass jar, add rolled oats, chia seeds and yoghurt.

2. Pour in milk till almost 3/4 full, drop in 1/2 teaspoon of vanilla extract if you are using then gently stir the mixture with a clean spoon to loosen the oats at the bottom of the jar.

3. Lastly add in your preferred berries (remember to rinse with water and pat dry with kitchen paper towel) and give a few stirs.

4. Cover the jar and leave the mixture overnight in the fridge.

5. In the morning, before having your oats you can top it with some extra mango cubes, roasted almond plus drizzle of honey (optional) to sweeten the taste.

芒果莓子隔夜燕麦

材料:
6汤匙(45克)有机燕麦片(organic rolled oats)
1/2杯牛奶
1/2杯优格/酸奶
1汤匙奇异籽 (chia seeds)
3颗草莓,切四分
5颗黑莓
1/2个芒果,切丁
1/2茶匙香草精, 随意
少许烤过的杏仁

做法:
1.用一个干净(烧水烫过并擦干)的玻璃瓶,放入燕麦片,奇异籽和优格。

2.之后慢慢加入牛奶直到近3/4满,再倒入1/2茶匙的香草精然后用干净的勺子轻轻搅拌把瓶底下的燕麦片和牛奶拌均已。

3.最后加入准备好的水果,再搅拌两三次,盖上盖子然后放进冰箱冷藏一夜。

4.隔天当你要享用时就以随意添加一些喜爱的果仁和蜂蜜调味,搅拌后就能享受一份健康又有营养的早餐了。
- See more at: http://www.ellenaguan.com/2014/05/4-recipes-overnight-oats-part-ii.html#sthash.czqUiHcP.dpuf
(Yield: 500ml Jar | Preparation: 5 minutes | Standing Time: Overnight)

Ingredients:
  • 6 Tablespoons (45g) of Organic Rolled Oats
  • 1/2 Cup Fresh Milk (can be slightly more)
  • 1/2 Cup Plain or Greek Yoghurt
  • 1 Tablespoon Chia Seeds
  • Some Strawberries, halved
  • Some Black Berries
  • 1/2 Portion of Mango, cubed
  • 1/2 Teaspoon Vanilla Extract, optional
  • Some Roasted Almond

Method:
1. Using a clean sterilized glass jar, add rolled oats, chia seeds and yoghurt.

2. Pour in milk till almost 3/4 full, drop in 1/2 teaspoon of vanilla extract if you are using then gently stir the mixture with a clean spoon to loosen the oats at the bottom of the jar.

3. Lastly add in your preferred berries (remember to rinse with water and pat dry with kitchen paper towel) and give a few stirs.

4. Cover the jar and leave the mixture overnight in the fridge.

5. In the morning, before having your oats you can top it with some extra mango cubes, roasted almond plus drizzle of honey (optional) to sweeten the taste.

芒果莓子隔夜燕麦

材料:
6汤匙(45克)有机燕麦片(organic rolled oats)
1/2杯牛奶
1/2杯优格/酸奶
1汤匙奇异籽 (chia seeds)
3颗草莓,切四分
5颗黑莓
1/2个芒果,切丁
1/2茶匙香草精, 随意
少许烤过的杏仁

做法:
1.用一个干净(烧水烫过并擦干)的玻璃瓶,放入燕麦片,奇异籽和优格。

2.之后慢慢加入牛奶直到近3/4满,再倒入1/2茶匙的香草精然后用干净的勺子轻轻搅拌把瓶底下的燕麦片和牛奶拌均已。

3.最后加入准备好的水果,再搅拌两三次,盖上盖子然后放进冰箱冷藏一夜。

4.隔天当你要享用时就以随意添加一些喜爱的果仁和蜂蜜调味,搅拌后就能享受一份健康又有营养的早餐了。
- See more at: http://www.ellenaguan.com/2014/05/4-recipes-overnight-oats-part-ii.html#sthash.czqUiHcP.dpuf

芒果糯米糍 (Mango Mochi)


有点意外,这次的的糯米团,
对我来说还真的不是普通的软,
让我在包裹内馅的过程,折腾了一番,
猜想,或许是不同牌子的糯米粉有着不同的吸水力,
又或者气候的干湿度影响了米团的软硬度,
幸好虽然没有圆挺挺的卖相,但是软糯香甜倒是赢了不少分。

如果让我再一次做,
我会将液体的总量至少减30毫升,
以图最后的糯米团就会扎实一些,但又不失美味,
重要是比较容易操作。


芒果糯米糍
(可做12个)
食谱参考 : 这里

材料:
糯米粉90克
玉米淀粉10克
椰浆150克
牛奶50克
糖粉50克
黄油15克
蛋黄1个
芒果1个
椰蓉适量(表面装饰用)
另准备熟糯米粉适量(防粘用)

做法:
1。椰浆、牛奶、蛋黄、糖粉、溶化成液态的黄油等配料全部放入大碗里,搅拌均匀。
2。倒入糯米粉、玉米淀粉,继续用手动打蛋器搅拌均匀,成稀糊状。
3。将混合物倒入可以放入蒸锅的容器,盖上一层保鲜膜,放入蒸锅,大火上汽后转中火蒸20分钟。
4。面糊蒸熟以后就凝固了,稍冷却以后,用筷子用力的搅拌糯米面团,使它光滑细腻。
5。搅拌好以后,冷却后,放入冰箱冷藏1-2个小时(面团刚蒸好的时候非常粘手,冷藏后会好一些。如果冷藏后的糯米面团依然非常粘手,可以视情况多冷藏一些时间)。

6。芒果肉切成小丁。
7。把冷却的糯米面团称30克左右一份,手掌沾一些熟糯米粉防粘,将面团压扁,面团中央放几粒芒果丁,包起来。
8。包好的面团,可 以用芒果汁或纯净水刷一刷表面,然后放到椰蓉里滚一圈,使它表面粘上一层椰蓉,芒果糯米糍就做好了。做好后放入冰箱冷藏1小时即可享用。

备注 : 个人觉得糯米团台软绵绵了,虽然美味可口,但是很难操作。 因此,液体部分应该可以减少30- 50克。


1。椰浆、牛奶、蛋黄、糖粉、溶化成液态的黄油等配料全部放入大碗里,搅拌均匀。倒入糯米粉、玉米淀粉,继续用手动打蛋器搅拌均匀,成稀糊状。
2。将混合物倒入可以放入蒸锅的容器,盖上一层保鲜膜,放入蒸锅,大火上汽后转中火蒸20分钟。
3。面糊蒸熟以后就凝固了,稍冷却以后,用筷子用力的搅拌糯米面团,使它光滑细腻。

1. Place the coconut milk, milk, egg yolk, icing sugar and melted butter in a big bowl. Mix the ingredients evenly.  Add in the glutenous flour and corn flour, then continue mixing the ingredients until it forms a thin batter.
2. Pour the batter into a  bowl and cover the bowl with cling wrap. Heat the steamer using high flame until the water boils before steaming the batter using medium flame for about 20 minutes.
3. After steaming, the batter will have solidified. Wait for it to cool down a little, thenwith the help of a pair of chopsticks, stir hardly the dough until it becomes smooth and shiny.


包好的面团,可 以用芒果汁或纯净水刷一刷表面,然后放到椰蓉里滚一圈,使它表面粘上一层椰蓉。
You can brush the surface of the mochi with some mango juice or water before rolling it in the shredded coconut. 


Mango Mochi 
(Yield 12 pcs)
Recipe adapted from : Here

Ingredients:
Glutenous flour 90g
Corn flour 10g
Coconut milk 150g
Milk 50g
Icing sugar 50g
Butter15g
Egg yolk 1
Mango 1
Some shredded coconut (for coating)
Some cooked glutenous flour ( prevent sticking )

Method:
1. Place the coconut milk, milk, egg yolk, icing sugar and melted butter in a big bowl. Mix the ingredients evenly.
2. Add in the glutenous flour and corn flour, then continue mixing the ingredients until it forms a thin batter.
3. Pour the batter into a  bowl and cover the bowl with cling wrap. Heat the steamer using high flame until the water boils before steaming the batter using medium flame for about 20 minutes.
4. After steaming, the batter will have solidified. Wait for it to cool down a little, then with the help of a pair of chopsticks, stir hardly the dough until it becomes smooth and shiny.
5. After stiring and allowing it to cool down, refrigerate the dough for 1-2 hours (this is to make the dough less sticky. If the dough is still too sticky after 2 hours, continue refrigerating for as long as you see fit).
6. Dice the mangoes.
7. Divide the chilled dough into 30g each portion. Dust your hands with some cooked glutenous flour and flatten each portion with your palm. Place a few cubes of mango in the middle of the dough and wrap it up.
8. You can brush the surface of the mochi with some mango juice or water before rolling it in the shredded coconut. Refrigerate the mochi for another hour before serving.

Tips:
 I personally feel that the mochi dough is too soft to handle even it is delicious. Therefore I will suggest to reduce the liquid portion 30 - 50g for future reference. 


好姐妹,不好意思,
今天我只能以这软绵绵的糯米糍与你同贴了,
希望你多多包涵,脆脆地就此“收货”好了,
哈。。。哈。。。。。


2015年11月9日星期一

墨西哥芒果沙沙 (Mexican Mango Salsa)


 这是一道五彩缤纷带墨西哥色彩的简单料理。
一般上是和墨西哥卷饼(tacos),炸马铃薯条 (chips)搭配或
当成沙律来平衡高肉的进食。


 今天安迪应了两父女的要求,
为了平衡这高肉的一餐,同时想耗掉那颗快熟透的芒果,
这样,一油炸,一清新的,
吃起来也没那么内疚了。


墨西哥芒果沙沙
食谱参考 : 这里

材料 :
芒果1颗(约350g)
新鲜芫茜  25g,切碎
大蒜 10g ,剁碎
洋葱  15g, 切丁
苹果醋 80毫升
辣椒  1条,切丁
细砂糖 50g
盐 适量
橄榄圈 一些

做法 :
1。 在一个大盆,将所有的材料搅拌均匀,冷藏于冰箱2个小时即可享用。


Mexican Mango Salsa
recipe adapted from : here


食材:
a. 芒果mango:1顆(約350g)
b. 新鮮芫荽Cilantro (coriander):25g(切碎)
c. 大蒜garlic:10g(切碎)
d. 洋蔥onion:250g(切丁0.7cm)
e. 蘋果醋cider vinegar:80㏄
f. 辣椒chili:2條(去子切小丁)
g. 糖sugar:50g
h. 鹽 salt :適量 - See more at: http://www.web-inlife.com/?q=node/86#sthash.pJGIHMcU.dpuf
食材:
a. 芒果mango:1顆(約350g)
b. 新鮮芫荽Cilantro (coriander):25g(切碎)
c. 大蒜garlic:10g(切碎)
d. 洋蔥onion:250g(切丁0.7cm)
e. 蘋果醋cider vinegar:80㏄
f. 辣椒chili:2條(去子切小丁)
g. 糖sugar:50g
h. 鹽 salt :適量 - See more at: http://www.web-inlife.com/?q=node/86#sthash.pJGIHMcU.dpuf
Ingredients
1 ripe mango (350g) diced 25g  cilantro/coriander  chopped
10g  garlic,chopped
15g  onion, diced
80ml  cider vineger
1 chili,diced
50g caster sugar
Some salt
Some olive rings

Method :
1.  In a mixing bowl, combine all the above ingredients.  Mix well and chill in the fridge for 2 hours. 


这芒果沙沙,酱汁酸酸甜甜,芒果清甜,
醒胃的辣椒丁和香菜,
加上五彩缤纷的卖相,
说是色,香,味具备,一点也不为过。


炎热的午间或油腻的炸食,
来杯芒果沙沙, 既消暑又解腻。
你不妨也来杯吧!


Related Posts Plugin for WordPress, Blogger...