2018年6月26日星期二

港式芒果椰奶黑糯米(Mango Black Glutinous Rice with Coconut Milk)


芒果椰奶黑糯米是一道港式甜品。
成品色泽亮丽诱人!

如果说它是泰式芒果椰奶糯米饭的姐妹,
应该没人会反对吧?


黑糯米又称之“紫米”。

含有丰富的营养,具有很好的滋补作用, 

因此被人们称为“补血米”、“长寿米”。 

喜欢粗谷糙米类的朋友,斋吃这黑糯米, 
其实还蛮甜美且健康。


芒果椰奶黑糯米
共 4人份

材料:
黑糯米  100克
清水      800毫升
冰糖       20克
芒果         2个

浓缩椰浆 150克
清水           30克
细砂糖       30克
盐              1/4茶匙


做法:
1。黑糯米洗净,清水盖过糯米,浸泡4小时以上。

2。芒果去皮去核,切成丁备用。

3。 椰奶,水,细砂糖和盐,小火煮至微滚,熄火,置旁待用。

4。黑糯米和泡黑糯米的水,大火煮开后转中小火,煮大约45到60分钟。

5。待糯米煮至熟软,加入适量冰糖,煮至冰糖融化即可。

6。 最后在一个深碟中,舀入适量的滤干糯米,排放适量的芒果丁,浇上适量的做法(3)椰奶即可趁热享用或冷藏后享用都可。


温馨提醒 : 
食谱中的冰糖和细砂糖份量是可以随个人的食甜度而自我调整的。


Mango  Black Glutinous Rice 
with Coconut Milk
for 4 pax

Ingredients:
Black glutinous rice  100g

Water 800ml
Rock sugar   20g
Mango    2

Concentrate coconut milk 150g

Water  30g
Caster sugar  30g
Salt    1/4tsp


Method:

1.   Clean the Black glutinous rice , Soak with water for about 4 hours.

2.   Remove the mango's skin and seed, dice it and set a side.


3.   In a small pot , cook the coconut milk, water, caster sugar and salt until start boil, remove from the flame,set a side.

4.   Cook the black glutinous rice with the soaking water until boiled, then turn the flame to medium continuous to cook for 45 min to hour.

5.   When the black glutinous rice is cooked and soft, add in the rock sugar, cook until the rock sugar is dissolved.

6.   In a shallow bowl, scoop in some drained black glutinous rice, some mango dice and drizzle some coconut milk from step (3). Serve while hot or after chilled in the fridge.


Reminder : 
The amount oh rock sugar and caster sugar in this recipe can be adjustable to suit individual taste.


黑糯米独特的香气;
酸酸甜甜的芒果丁;
清甜带微咸的椰奶;
一大匙进口,幸福满满哦!


@@@@@@ Enjoy ! @@@@@@


2018年6月24日星期日

木纹巧克力乳酪馒头(Wood Print Chocolate and Cheese Man Tou)


网上看到彭秋婷老师分享的木纹馒头,很喜欢。。。
脑海顿时起了念头,
于是,姑且一试,满足自己的好奇心呗。


第一次尝试,担心无法掌握,
只做了原食谱2/3量,
果然。。。
没有老师的精致,
所以说嘛。。。。“老师”两字不是白叫的哦。
馒头这易学难精的课,
我。。我。。还须加把劲呢!


性格的木纹外貌,内涵是咸香的乳酪酱。
有点中西合璧的感觉,你怎么说?


瞧! 还没进入蒸锅的木纹,多清晰!!


木纹巧克力乳酪馒头
共做 8 个

材料A: 
  40克       老面种
200克       中筋面粉
    2克        即溶酵母
  25克        细砂糖
100毫升   温奶

    5克        奶油


材料B:
可可粉– 少许
黑可可粉 – 少许


材料 C :
乳酪片-  8片


做法参考 : 这里


1。  将全部材料A拌成团,揉至光滑状态后,均分成4个面团。


2。  两个面团1组,分别加入不同的材料B,揉至均匀即可。


3。  让面团松弛15分钟。 取其中1份面团,以杆面棍杆成长形,然后对中3折。同样的步骤,重复2次。最后再杆长形,直接卷成长筒型。


4。   将长筒形面团,再切成3个小面团,搓圆后,擀成薄片状 。

5。   把1片可可色薄片重叠在黑可可色的薄片上,然后杆成长形,卷起成圆柱体,稍微压扁,2端对折, 用小刀在中间部分,切1刀,打开,再以杆面棍,杆成长形,翻面,条文向下方,上面排上乳酪片,徐徐地卷成馒头状。


6。   把木纹馒头排放在盛有凉水的蒸锅内作最后发酵, 约25分钟或至1.5倍大 。


7。   开中大火蒸,约12分钟即可。


Wood Print Chocolate and Cheese Man Tou
Yield 8 buns

Ingredients A:

  40g        starter dough
200g        flour
    2g        instant yeast
  25g        caster  sugar
100ml      warm milk

Ingredients B:
Some cocoa powder
Some dark cocoa powder


Ingredients C :
Cheedar cheese   8 slices


Method refer : Here


1.  Knead all ingredients a into a smooth dough, divide it into 4 equal portions.


2.  Divide 2 doughs in 1 group. Mix first group with cocoa powder, second group with dark cocoa powder, then knead well.

3.  Let the  doughs rest for 15 minutes. Use the rolling pin to roll one of the dough into oblong shape and make a 3 folds inward center. Repeat the same steps 2 time. Use rolling pin to roll into oblong shape again, use finger to roll it become cylinder shape.

4.  Cut the cylinder dough into 3 small portions. Roll it into ball shape, use rolling pin to roll it into disc.

5.   Place a piece of cocoa dough above a piece of dark cocoa dough, using rolling pin to roll it into oblong shape, use finger to roll it become swiss roll alike. Slightly press on it, make a fold .  Make a cut in the middle, open the dough, use the rolling pin to roll again into oblong shape,turn over( the print facing downward), put the Cheedar cheese slice on it, slowly roll it into Man Tou shape.

6. Arrange the Wood Print mantous into a steamer and allow it to rest fro another 25 minutes or until it has risen to about 1.5 times its original size.

7. Steam over a medium-high flame for about 12 minutes.


虽然还是有待进步的空间,
不过就色泽来说,调得还是令人满意的。

最后衷心的向老师致万二分的谢意,
谢谢老师无私的分享,
感恩哦!


告诉自己,下会的面团一定要搓得更足力一些。
酱才不会皱皮的。


@@@@@ Enjoy ! @@@@@


2018年6月22日星期五

双色牛油蛋糕 (Marble Butter Cake)


下午好,
有人想念牛油蛋糕了吗?

欢迎入座,一起享用新鲜出炉,香喷喷的牛油蛋糕。
有谁和安迪一样,喜欢喝斋啡,
那就一块下午茶好了。


尝过Mrs Ng SK 牛油蛋糕的朋友,
一定会想念那蛋糕的湿润与浓郁的牛油香气吧?

今天安迪依然旧谱新作。
添了2 汤匙的可可粉,让朴实的外貌多了几分姿采。
也给传统的牛油口味,添加疗愈的巧克力味。


湿润依然。。。。芳香有加。。。。
个人还蛮喜欢的。


双色牛油蛋糕
一个8x8寸方形烤盘
食谱参考 :这里

材料料 (A):
蛋白(A级鸡蛋) 3个
细砂糖                   50克

材料(B)
牛油 230克
细砂糖  130克
蛋黄 (A级鸡蛋)  3个
自发面粉  200克(过筛)
牛奶   60毫升
香草荚 1条, 用刀子刮出香草籽 (或1茶匙香草精)
可可粉  2汤匙


做法:
1。将蛋白打至起泡后,分3次加入50g的幼糖打至接近硬性发泡。
2。将材料(B)的牛油和细砂糖用搅拌器打至松发,然后加入香草籽,稍微打一下。
3。逐粒加入蛋黄,拌匀后才加入第二粒。
4。将一半的面粉加入,以慢速搅拌均匀后,牛奶分两次慢慢加入,搅拌均匀,再将剩下的面粉加进去,搅拌均匀。
5。将1/3的面糊加入2 汤匙可可粉,拌匀成可可面糊;剩余的2/3保留原味。
6。蛋白霜分两次,个别轻轻的拌入2种面糊里,拌匀。
7。然后两色面糊交替舀入以抹油和铺了纸的8 x 8寸方形模子。
8。放入已预热的烤箱,以160°c烘50分钟或至熟。


温馨提醒:
~  如果采用B级鸡蛋,需要换成4个(或包壳重量为200克)
~  原食谱的蛋白霜打至硬性发泡,个人觉得“接近硬性发泡“和牛油蛋黄糊会比较容易混合,所以稍微减少了打蛋白的时间。过硬的蛋白霜不止难于混合,出来成品往往会爆脸哦。
~  逐粒加入鸡蛋,拌匀后再加,会使面糊更为顺滑,出来成品,组织会较绵密。


Marble Butter Cake
1 8×8-inch baking pan.
Recipe adapted from :Here

Ingredients (A):
3   Egg White(Grade A) 
50g  Caster sugar 
          
Ingredient (B)
230g  Butter

130g  Caster sugar 
3   Egg yolk (Grade A)
200g   Self raising flour (Sifted)
60ml    Milk
1 vanilla bean, seeds scraped (or 1 tsp vanilla extract)

2 Tbsp cocoa powder


Mehtod :
1. In a clean mixing bowl, whisk the egg whites until it turns foamy. Slowly and gradually, add the sugar (50g), whisking all the while. Whisk this until  almost stiff peaks form.

2. In the bowl of a mixer, cream the butter and sugar until it turns light and fluffy.  Add the egg yolks, one a time and beat it in before adding the next. Beat in the vanilla extract.

3.  Fold in half the flour.  Add the milk and mix. Add the remaining flour and fold until just incorporated.

4.  Mix 1/3 of the batter with 2 Tbsp cocoa powder to form chocolate batter; the remaining 2/3 of the batter keep as original flavor.

5.  Separately transfer  the egg whites(meringue) into the 2 types of batter by 2 batches. Gently fold it until all the meringue have been incorporated.

6.  Scoop in alternately  the 2 types of batter  into a lined and greased 8×8-inch baking pan.

7.  Bake at preheated oven 160°C for 50 minutes.


Tips:
~  If you are using Grade B's egg, then have to use 4 eggs ( total weigh including shell equal to 200g)
~  The original recipe noted the meringue is needed stiff peak.  However base on my personal experience, the "almost stiff peak foam" will be easier to fold in the butter egg yolk batter.   
~   Add the egg yolks, one a time and beat it in before adding the next is to ensure the incorporation of the batter, so that the end product will get fine and smooth texture.


@@@@@@ Enjoy ! @@@@@@

2018年6月20日星期三

杏鲍菇竹荀素包( Steam Bamboo shoot and Mushrooms Buns)


那天炒了一锅香喷喷的杏鲍菇竹荀,裹起一串南瓜粿粽
第一次尝试,结果内馅多出了1/3,
当天就把它藏入冰格里去。

今天想起暖洋洋的包子了,
临时网上参阅了这不需用包粉的谱,
因为我家只有普通面粉,
所以一贯的就地取材,蒸包了馅呗。。


请原谅和忽视我粗手粗脚的捏功,
在努力中了。。。。
哈。。哈。。。
希望来着的时日,会有让人赏心悦目的一刻吧!

虽然没有精致的捏功,
但是。。。但是。。
有一样是很开心的,
那就是这包皮好松软,好松软,
一点都不沾牙,好好吃!
我。。。超爱滴!
所以迫不及待的与大家分享咯。


瞧!。。。。是不是很滑的表层?
还有松软的包体?
强荐啊。。!


由于面团容易操作,所以忍不住,
学人捏起柳叶包了,
嘻。。。嘻。。。
还是有待改善中:)


杏鲍菇竹荀素包
共做 9个

内馅材料 :
杏鮑菇    80克
干香菇      2朵 (浸水泡软)
竹荀       100克(滚水煮熟)
菜脯        13克   (泡水去咸)
油適量

 調味料:砂糖2茶匙、五香粉1茶匙、醬油膏1汤匙、黑胡椒粉1茶匙

包皮材料:
普通面粉    250克
幼糖   50克
盐1/4 茶匙
即溶酵母   3克
白油  25克
温水   120克
双倍发粉   3 克

做法 : 

1。杏鮑菇、干香菇、熟筍切丁。

2。将杏鮑菇先入锅,干炒出香气备用。

3。起油锅,放入香菇爆香,再放入筍丁、杏鮑菇、菜脯拌炒,並且加入砂糖、五香粉、黑胡椒粉、醬油膏調味后,起锅放涼成为馅料备用。

4。  在面团搅拌盆里,注入温水,加入幼糖拌匀,加入即溶酵母,面粉,白油和盐;启动搅拌机,搅拌约10分钟或成团。加入双倍发粉,继续搅拌约20分钟或成顺滑的面团。

5。  取出面团,分割诚9份,每份约50克。 搓圆,休面10分钟。

6。  取1 份小面团,压扁,以杆面棍将周边杆薄,包入1 汤匙馅料,捏成包状,底部垫纸,排放在蒸笼里,发酵30分钟。

7。   大火蒸12分钟即可。


Steam Bamboo shoot and Mushrooms Buns
Yields 9 buns

Filling : King oyster mushrooms   80g
Dry mushroom                2 (Soak in the water for soften)
Bamboo shoot          100g  (Boiling water to cook)

Pickled white radish   13g (Soak in the water to reduce the saltiness)
Some oil


Seasoning :

sugar 2tsp

5 spices powder 1tsp

Soya sauce 1Tbsp

Black pepper powder1tsp

Dough:
Flour    250g
Sugar   50g
Salt 1/4 tsp
Instant yeast 3g
Shortening  25g
Warm water   120g
Double Act. baking powder   3 g

Method:
1.  Diced the king oyster mushrooms,dry mushrooms and cooked bamboo shoot.

2.  Dry- saute the king oyster mushroom with pan until fragrant.

3.  Heat up oil in a pan, saute the mushroom, add in bamboo shoot, king oyster mushroom and pickled white radish, saute-fry until fragrant. Add in seasoning stir evenly and remove from the pan. set aside for later use.

4.   Pour the warm water and sugar into the dough kneading bowl, stir well.  Add in instant yeast, flour, shortening and salt; start to knead about 10 minutes. Add in double Act. baking powder, continue to kneadabout 20 minutes or become smooth dough.

5.   Remove the dough from the kneading bowl, divide the dough into 9 equal portion. Each portion about 50 g, roll it into ball and rest for 10 minutes.

6.   Press one of the small dough, use rolling pin to roll around the edge, wrap with 1 Tbsp filling and shape it into bun. Put piece of paper underneath the buns and arrange them into the steaming tray and rest for 30 minutes.

7.  Steam with high flame for about 12 minutes.


松松软软的包体,香喷喷的内馅。


悄悄给自己的约定,
下一次的分享,纹路一定要有所进步。


喜欢这包皮的配方,
想着可以再尝试不同的馅料搭配,
应该也会很美味的。


@@@@@ Enjoy  ! @@@@@@


2018年6月18日星期一

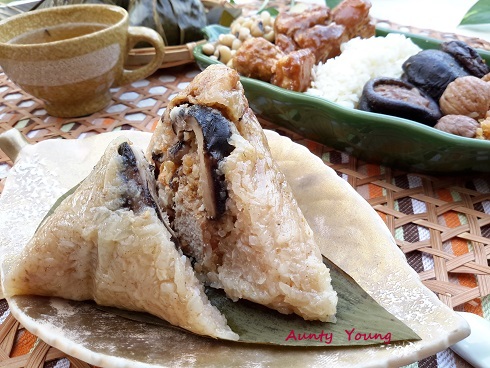
2018 ~ 端午节之肉粽 (2018 Bak Chang)


农历五月初五,正逢端午节
来,陪安迪裹粽子,
一起投入粽叶飘香的佳节氛围里。。。
端午节快乐!!


或许,你对于裹粽子,一窍不通;
没关系,只要有心,没有不成的事。

记得6年前的我第一次学裹粽子。
当时是一位姐姐,不辞辛苦,
陪我从购买材料,洗煮粽叶,
香抄糯米,配料,裹粽,烹煮,

最后,当一串串香喷喷的粽子,
获得家人的青睐与肯定,
那种成就感,真的非笔墨所能形容滴!

所谓: 饮水思源,
趁此佳节,安迪想起我的裹粽师傅,
谢谢你,秋仪姐姐
感恩有你!


今年安娜出门在外,安迪破列裹上咸蛋黄。
皆因她不懂欣赏。

试过在月饼裹上咸蛋黄,她吃后,
竟然说,月饼腐坏了,
原来,小姐不懂欣赏咸蛋黄的美味,
哈。。。所以说,口味的东西,是很个人的。


食谱参考  : 这里
Recipe adapted From : Here 


如果你看了蠢蠢欲动,
那就开始行动,为你心爱的家人裹串香喷喷的粽子吧!


端午节快乐!

@@@@@@ Enjoy ! @@@@@@


2018年6月14日星期四

南瓜粿粽 (Pumpkin Kueh Dumpling)


最近,因缘之下,结识了一些如素的朋友。
一番耳濡目染之下,安迪开始对素食起了好奇心。

今天就玩玩这美味可口的素食南瓜粿粽。
第一次尝试,只裹了10粒。
自家尝2粒,觉得不错,
尤其喜欢杏鲍菇的香气;竹荀的嚼劲感。

其余8粒,分别与3位素食亲友结缘了。


这碗由杏鲍菇,蘑菇,竹荀和菜脯超出来得内馅,
还镇的香气四溢,美味十足。

如果好荤的朋友,
可以猪肉块取代竹荀;虾米取代菜脯 。
我想依然美味可口!
毕竟,见仁见智,口味的东西是很个人的。


南瓜粿粽 
共做 10 个
食谱参考  : 这里

材 料:
南瓜泥    150克
糯米粉    250克
油            25克
水           100克

杏鮑菇   150克
干香菇      4朵 (浸水泡软)
竹荀       200克(滚水煮熟)
菜脯         25克   (泡水去咸)
油適量


粽叶 10 片
棉绳 10条

 調味料:砂糖3茶匙、五香粉2茶匙、醬油膏2汤匙、黑胡椒粉2茶匙

作 法:

1。杏鮑菇、干香菇、熟筍切丁。

2。将杏鮑菇先入锅,干炒出香气备用。

3。起油锅,放入香菇爆香,再放入筍丁、杏鮑菇、菜脯拌炒,並且加入砂糖、五香粉、黑胡椒粉、醬油膏調味后,起锅放涼成为馅料备用。

4。 把所有的糕皮的材料(除了水)放入容器里。搅拌均匀。

5。慢慢加入清水,将材料搓成面团。大约搓5分钟至面团有点弹性便可。

6。把面团平均分割成10 份。 每份重约55克。

7。取1份面团裹入1汤匙餡料,捏合收口並且均勻的滾上油後,放入粽叶中,再用棉繩綁紧,最后水滚,转中火蒸约12分钟或熟即可。


Pumpkin Kueh Dumpling
Yield 10 pcs
Recipe adapted from  : Here 

Ingredients :
Mashed pumpkin    150g
Glutenous rice flour    250g

Water          100g

King oyster mushrooms   150g
Dry mushroom      4 (Soak in the water for soften)
Bamboo shoot     200g  (Boiling water to cook)

Pickled white radish  25g (Soak in the water to reduce the saltiness)
Some oil

 10 Bamboo leaves
 10 Strings

Seasoning :
sugar 3tsp
5 spices powder 2tsp
Soya sauce 2Tbsp
Black pepper powder2tsp


Method:
1.  Diced the king oyster mushrooms,dry mushrooms and cooked bamboo shoot.

2.  Dry- saute the king oyster mushroom with pan until fragrant.

3.  Heat up oil in a pan, saute the mushroom, add in bamboo shoot, king oyster mushroom and pickled white radish, saute-fry until fragrant. Add in seasoning stir evenly and remove from the pan. set aside for later use.

4.  Mix all the dough ingredients (except water) in a bing bowl.

5.  Slowly add in water to knead into a smooth dough.  (about 5 min)

6.  Divide the dough into 10 equal portion. Each about 55g.

7.  Wrap 1 portion of the dough with 1 Tbsp of filling, seal it up and coated with oil. put it into bamboo leaf cup then  fold to form the dumpling shape.  Loop it around with a string, tying it to secure. 

8.  Place the Pumpkin Kueh Dumpling into boiling water steamer,cover and steam over medium heat for 12 minutes or till cooked. 


如果你也喜欢菇类,竹荀,
不妨也试试做这道料理,
相信我,它其实还真的很不错!


 ·@@@@@ Enjoy ! @@@@@@