2013年3月31日星期日

香芋分层蛋糕( Yam Layer Cake)

粗拙的手法,贫乏的构思,
甚至有点手忙脚乱,
一点惊慌,又一点兴奋,
最后。。。。。。。。。。。。
达得拉。。。。。。。
 人生第一个装饰蛋糕,终于面世了。


每回浏览众姐妹的部落格,
看见装饰美美的各类蛋糕,
就把我引得心痒痒,
今天,总算缘到事成,
有了自己装饰蛋糕的记录。


第一次用奶霜,难免错漏百出,
但是,内心还是喜悦的,
毕竟是自己一手一构思的作品,


虽然比起一般蛋糕店的专业水平,还有一段距离,
但是以一个新手来说,
情人眼里,早已出西施咯,哈。。。。。

美中不足的是,
香芋酱糊虽然美味可口,
但是略嫌不够顺滑,
造成小小的遗憾


虽然蛋糕的外貌装饰功力不够,
但是味道和口感却不错,
尤其那真材实料的香芋酱糊,
真的超甜香,超好吃~ ~ ~ 


食谱参考: Alex Goh

Ingredients :  

1  9" round vanilla sponge cake
A.    800g water
       200g sugar
       pinch of salt
       2 tbsp agar-agar powder
B.    300ml coconut milk
       300g yam cooked
C.    200ml coconut milk
       85g cornflour
D.   1/8 tsp purple colouring

Method : 
1.    Cut the vanilla sponge into 3 horizontal layers.
2.    Cook (A) till boiling.
3.    Mash the cooked yam while it is still hot with coconut milk from (B).  Add it into (A), mix till well blended.  This mixture can be sieved to obtain a finer and smoother texture.
4.    Continue to cook the above mixture till it boils, then add (C) and cook till thicken.
5.    Place the 1st layer of the cake into a 10" round spring-form mould.  Pour some of the yam pudding and smooth over, then top with another layer of cake.
6.    Repeat the above steps 2 more time, finishing with the pudding on top.
7.    Let it cool, then refrigerate.
8.    Unmould, coat the side of the cake with desiccated coconut.    

2013年3月30日星期六

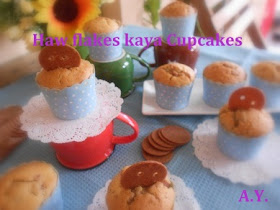
山楂咖椰小蛋糕(Haw Flakes Kaya Cupcakes)

别有一番滋味的小蛋糕,
~ ~ ~ 山楂咖椰小蛋糕~ ~ ~


一直以为这山楂如酸梅,
当零食来咬,
没想到还可以做蛋糕,
而且是意想不到的美味可口!


咖椰的香甜,
遇上酸甘的山楂,
竟然擦出美味的火花。


山楂咖椰小蛋糕

食谱参考: Y3K 小蛋糕
材料:
A:  牛油130克                                              
山楂(Haw Flakes)

      糖粉50克
      鸡蛋(B) 2粒,打散
B:  自发面粉170克
      咖椰100克(我减至80克)
     山楂5 筒,弄碎

装饰:
山楂1筒

用具:
10个纸杯(2。2寸 X 1。7寸)

做法:
1。  将(A)料的牛油及糖粉搅打至幼滑,慢慢加入蛋液后,再拌入(B)料。
2。  将(1) 舀入纸杯内至八分满,排好在烘盘,放入已预热的烘炉,以 160‘C 烘15 - 20 分钟,取出待凉,随意装饰。


Haw flakes are Chinese sweets made from the fruit of the Chinese hawthorn. The dark pink candy is usually formed into discs one millimeter thick.  Also known as "Saan Zaa Beng" (山楂餅) Cantonese


Haw Flakes Kaya Cupcakes

Recipe adapted from Y3K - Cupcakes
Ingredient
A:   130g butter
      50g icing sugar
      2 eggs grade - B (beaten)
B:   170g self-raising flour
      100g kaya 
       (I reduced to 80g )
      5 rolls haw flakes (crushed)

For Decoration
1 roll haw flakes

Material needed:
10 pcs paper cups (2.2" x 1.7")

Method:
1.   Beat butter and sugar until smooth.  Add in eggs in a slow stream. Add in  ingredient (B) ,mix well.
2.   Spoon no.(1) into paper cups 3/4 full.  Arrange on a baking tray.  Bake in a preheat oven at 160'C
for 15 - 20 minutes.  Once cake cooled, decorate it per desire.


~ ~ ~ Enjoy ~ ~ ~

2013年3月28日星期四

香芋相思蛋糕(Yam Ogura Cake)

今天,想要温习一下相思蛋糕的做法,
毕竟“它”对我来说,还是很新颖的食谱,
想来点新尝试,刚巧家里有芋头,
就胆粗粗的开炉咯!


做的时候,也是心大心小的,
脑子里,飘个不停,
一会想像它的颜色,该不会紫得恐怖;
一会担心芋泥过重,蛋糕发不起;
又会不会蛋糕体粗涩?。。。。。。
总之就是忐忑不安。


幸好杞人忧天,
蛋糕在烘时,就芋香飘满屋,
出炉时,更是颜色均匀,完整无损,
冷却之后,切片也是软绵好看的相思蛋糕。


吃起来,就香香的芋头味,
口感保持一贯的绵软,
小小的成就感哦!

 香芋相思蛋糕


材料:


A
蛋黄 100克                                                             
 
香芋糊
全蛋 1 个
盐 1/4 茶匙
粟米油 60克

香芋泥 60克
香芋糊 1 茶匙 (烘焙材料店买)
低筋面粉 75克

B
蛋白 200克
细砂糖 80克
柠檬汁 1茶匙

烘具:
7寸方模
 
做法 (A)
1。蛋黄、全蛋、盐、粟米油、香芋泥和香芋糊用打蛋器打至起小泡。
2。筛入低筋面粉再打滑,放一边备用。

做法 (B)
1。蛋白加+柠檬汁+细砂糖打至起泡不跌
2。最后把A和蛋白霜混合至均匀。(像戚风蛋糕的混合法)
3。将面糊倒入7寸的方模里,把空气敲出。 放入预热后的烤箱里,于蒸烤法160'C烘烤50分钟或至熟便可。
4。蛋糕烘好后,立刻取出,倒扣待凉后才切开享用。


Yam Ogura Cake


Ingredients:

A
egg york         100g
whole egg       1
salt                 1/4 tsp
corn oil           60g 
mash yam        60g
yam paste 1tsp (available at baking ingredient shop)
superfine flour 75g 

B
egg white      200g
castor sugar  80g
lemon juice   1 tsp

utensil :
7"square spring-form pan


Method :

A
1.  Beat the  egg york,whole egg,salt,corn oil,mash yam and yam paste until fluffy.
2.  Shift in superfine flour, then mix it until smooth and well combined, put aside.

B
1.  Beat egg white + lemon juice + castor sugar until stiff.
2.  Mix method A's mixture with egg white mixture evenly .(apply chiffon cake mixing method)
3.  Pour the mixture(B2) into the 7"pan, try to get rid of the air by lightly tapping the pan.
4.  Put pan into a larger pan half-filled with hot water. Bake with preheated oven at 160'C for50 min or until baked.    
5.  Once baked, remove from the pan immediately, inverted on a rack and let it cool.  


刚出炉的香芋相思蛋糕 ~ ~ ~
Fresh-from-oven Yam Ogura Cake ~ ~ ~


冷却后的香芋相思蛋糕 ~ ~ ~
 Yam Ogura Cake,after cooled ~ ~ ~


~ ~ ~ enjoy ~ ~ ~


2013年3月27日星期三

香蕉慕斯(Banana Mousse)

之前做了摩卡慕斯,
安家兄弟不啬地给于赞赏。
所谓鼓励既是推动力,
于是,借用这股推动力,
让这美味的香蕉慕斯,顺利的诞生咯~ ~ ~


可能稍添经验,这回的慕斯幼滑多了,
而且乳白色,感觉上较轻盈,
我反而较喜欢。


没想到用来做装饰的山楂片,
意外的和这香蕉慕斯还蛮搭的,
微微的酸意,醒神哦!


炎热的下午,让人只想躲在屋里,
或许一杯香滑,冰凉的慕斯,
有着解暑的功效。


食谱摘自:慕斯的诱惑

香蕉慕斯
慕斯层
200毫升 牛奶
20克 奶精粉
1汤匙 鱼胶粉
450克 香蕉肉
1汤匙 柠檬汁
240克 鲜奶油
2个 蛋白
40克 细砂糖
1/4茶 匙豆蔻粉

装饰
山楂片,黑芝麻

用具
9个(170毫升)玻璃小杯

做法
1。  慕斯层: 牛奶,奶精粉,蛋黄和鱼胶粉混匀,隔着不停沸水搅煮呈浓稠状。
2。  香蕉和柠檬汁打烂成泥,拌入蛋黄混合物中,过筛备用。
3。  鲜奶油打起至软性。
4。  蛋白打发,慢慢加入细砂糖,继续打发呈硬状,加入鲜奶油中,拌匀成蛋白奶油。
5。  把蛋白奶油加入香蕉混合物中,加入豆蔻粉,拌匀成慕斯。
6。  把慕斯分盛小杯中,冷藏至硬状。
7。  取出慕斯,食用前,稍装饰即可。


Recipe adapted from "Charming Mousse"

Banana Mousse
mousse ingredients
200ml milk
20g coffee-mate
2 egg yolks
1 tbsp gelatine powder
450g banana flesh
1 tbsp lemon juice
240g fresh cream
2 egg whites
40g castor sugar
1/4 tsp nutmeg powder

Decoration
Haw flakes ,sesame seeds

Utensils
9 pic 170ml's glasses

Method
1.  To make mousse, combine milk,coffee-mate, egg yolks and gelatine powder.  Stirring over simmering water until mixture thickens.
2.  Blend the banana with lemon juice until fine.  Fold into yolk mixture.  Through and leave aside.
3.  Whisk fresh cream until soft peaks.
4.  Whisk egg whites until soft peaks.  Gradually add in sugar, continue whisk until stiff peaks form.  Fold into whipped cream toform white cream.
5.  Fold the white cream into banana mixture.  Add in nutmeg powder to form mousse.
6.  Pipe the mousse into glasses. Refrigerate until set.
7.  Decorate prior to serve.

2013年3月26日星期二

香橙杏仁小蛋糕(Orange Zest Almond Flake Cupcakes)

那天在大众书局拾宝时,
也有缘遇上这本“Y3K的小蛋糕”
知道Na Nak 喜欢烘焙,尤其这类可爱的小蛋糕,
因此,虽然只有八折,还是买回来,
趁假期,陪她玩玩烘焙。


家里因为清明祭祖,突然多了好多香橙,
向来就顺况取材的安迪漾,
当然来个香橙之类的。。。。。。。


综合杏仁和香橙的香味,
蛋糕体还蛮湿润,
配上鲜香的香橙屑,
好味!


食谱摘自: Y3K小蛋糕

材料
A  牛油 100克
    糖粉 75克(我放65克)
    鸡蛋(B) 2 粒打散
B  鲜橙汁 1汤匙
    杏仁粉 30克
    发粉  2茶匙
    普通面粉 100克
C  杏仁片少许
    橙皮屑少许
用具
2。2寸 x 1。5寸纸杯9个

做法:
1。  将(A)料的牛油及糖粉搅打至幼滑,慢慢搅入蛋液后,加入(B) 料拌匀。
2。  将(1)舀入纸杯内至八分满,撒入杏仁片,排好在烘盘上。
3。  将(2) 放入预热烤炉,以150“C 烘 15 - 20 分钟以160‘C烘23分钟),取出待凉,撒上橙皮屑。


Recipe adapted from : Y3K Cupcakes

Ingredient
A   100g butter
     75g  icing sugar reduced to 65g)
     2 eggs (grade B),beaten
B   1 tbsp fresh orange juice
     1 tsp grated orange zest
     30g almond poeder
     100g plain flour
     2 tsp baking powder
C   Some almond flake
     Some grated orange zest

Material needed
9 pcs paper cups (2.2" x 1.5")

Methods:
1.   Beat butter and sugar until smooth,slowly add in eggs. Then add in ingredient (B),mix well.
2.   Spoon No 1. into the paper cups until 3/4 full. Sprinkle almond flakes on top. Arrange it on the baking tray.
3.   Bake in a preheat oven at 150'C for 15 - 20 minutes.(I bake at 160'C for 23 minutes)Cool well and top with grated orange zest.

 Y3K - 小蛋糕

2013年3月25日星期一

摩卡慕斯( Mocha Mousse)

昨天翻阅“慕斯的诱惑”,
这摩卡密斯,占了家里都具备材料的便宜,
就被安迪漾相中,
成为众食谱当中的第一炮


炎热的下午,
来杯冰凉香滑的摩卡慕斯,
顿时睡意全消,凉意阵阵。


有感原食谱的即溶咖啡粉过量,
自己稍做调整,
出来效果,不错,
香醇的摩卡味依然,
幼滑的口感加分。


食谱载自“慕斯的诱惑”

慕斯层
150克 巧克力
50 毫升 牛奶
1 1/2 汤匙即溶咖啡粉( 我减至1 汤匙 )
150克 鲜奶油
2个蛋白

装饰
适量的可可粉,芝士粉

用具
10个(70 毫升)玻璃杯

做法
1。  慕斯层: 将巧克力切碎,与牛奶及咖啡粉盛入耐热碗中。
2。  隔着沸水调至巧克力溶化,离火。
3。  鲜奶油打起至软性,蛋白打发至松软状,加入鲜奶油中,成蛋白奶油。
4。  把蛋白奶油拌入溶化巧克力中,拌匀成慕斯。
5。  把密斯挤分盛小杯中,冷藏至硬状。
6。  取出慕斯,食用前稍加装饰即可。


Recipe adapted from "Charming Mousse"

Mousse ingredients
150g chocolate
50ml milk
1 1/2 tbsp instant coffee (I used 1tbsp )
150g fresh cream
2 egg white

Decoration
chocolate power ,cheese powder

Utensils
10 of 70ml glasses

Method
1.  To make mousse,chop the chocolate,combine with milk and instant coffee in a heatproof bowl.
2.  Keep stirring over simmering water until chocolate melted.
3.  Whisk fresh cream until solf peaks. Then whisk the egg whites until soft peaks. Fold into whipped cream, mix well.
4.  Fold the egg white cream into chocolate mixture until well combined.
5.  Pipe the mousse into glasses.  Refrigerate until set.
6.  Decorate as desired before serving .

2013年3月24日星期日

大众书局,拾到宝

学校假期来临,
大众书局一贯的大促销,
安迪漾刚好那天,和安哥宋去Summit “撑台脚”,


既然有缘遇上了,
那就意思意思搬回几本“好康”,
就与大家分享安迪漾究竟拾到那些宝。 


首先有这本step by step ,frame by frame baking,
既是每个步骤说明详细,还备图供看,
(共有55个食谱)
对最近满腔热血于烘焙,又有勇无谋的安迪漾来说,
来得正是时候,而且价值:Rm 5.00,
哈。。。。。。便宜!
超值!


前些日子,娘惹糕点做得勤,
这本Kueh Flavour by Wong Kim Meng ,
有别一般的娘惹糕,
主要是邻国如:泰国,印尼,香港,中国的一些特别糕点,
于是决定把它带回家,
价值: Rm5。00,
是不是“好康”?


名厨师 - 张莉婵的署作 - 新马佳节美食。
共有64 道佳肴,当中不乏三大民族的特色菜肴,
Rm 5.00,
嘻。。。。。又拾到宝。


这两本应该姐妹们很熟悉吧!
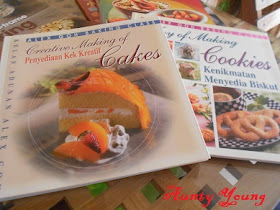
对了,常常在姐妹们的部落格被提名的Alex Goh 大烘焙师耶!
虽然只能买到巫英版,
但是价值还是每本Rm 5.00,
所以安迪漾,两本都买,
希望有了“它们 ” 的指引,安迪漾的烘焙进展,节节上升:)


最后是这本“慕斯的诱惑”,
里边每一道慕斯,都叫人垂涎三尺,
每回看到姐妹们程上幼滑,大方得体的慕斯蛋糕,
总叫我干羡慕,
所以看到这书时,就觉得这该是我学“慕斯”的启蒙老师了,
价值Rm 8.00, 虽然稍高,比起原价Rm17.00,
还是物有所值呀!

*********************************************************

姐妹们,平时从你们的部落格受惠多了,
今天难得安迪漾找到“好康”,
如果是同道的,可别“执输”了,
快快行动吧!
拾到宝,很开心的哦!
嘻。。。。。